Printable Version of Topic
Click here to view this topic in its original format
F-Body Road Racing and Autocross Forums _ General Discussion _ The new to me 1992 Z28
Posted by: trackbird May 26 2007, 03:59 AM
It's in the garage and I took a few photos (in the garage). They aren't great, but you can get an idea of what kind of work I still have cut out for me.
Don't give me any crap about the picture sizes. I switched this machine to Windows Vista and my resizer won't work and I had to find another one. So, I'm stuck with what I've got right now.
It's a bit ugly, and plenty dusty, but it's "mine".

|

|

|

|

|

|

|

|

|
Posted by: Mericet May 26 2007, 04:05 AM
You even have a seat for it now!
Posted by: AndyJ May 26 2007, 04:08 AM
You have been slacking lately with no car to work on. I'd say you better get cracking. 
Posted by: trackbird May 26 2007, 04:51 AM

Yes I do. Thank you very much for the donation!
You just want to autocross it, that's why you gave me a seat.....

Posted by: Jon A May 26 2007, 10:36 AM
What intake manifold is that?
Posted by: v7guy May 26 2007, 10:46 AM
looks like a good start, congrats. Can't wait to see what you do with it.
Also... what Jon said.
Posted by: trackbird May 26 2007, 12:40 PM
Holley Stealth Ram. It's basically an EFI tunnel ram setup. I guess Holley is selling it as a Weiand piece too, but it's this one:
http://www.jegs.com/webapp/wcs/stores/servlet/product_10001_10002_88790_-1
Posted by: Mericet May 26 2007, 02:27 PM
Whatever it takes man, whatever it takes!

Posted by: trackbird May 26 2007, 02:49 PM
Whatever it takes man, whatever it takes!
Well, this one has "track whore" written all over it. I've got a brake kit in a box, 4 IROC wheels in a stack, a seat on the floor, Koni's in a box, rear GC springs and jacks in the corner, tires on the way, and a 22mm hollow sway bar in the garage. I need front springs, front Koni's and 17" wheels (and to get all of it installed).
Let me know when you're bored.....

It's already got a large front sway bar, SFC's, and a reasonable amount of torque (and possibly some horsepower).
Posted by: nape May 26 2007, 03:15 PM
17" wheels are overrated. Run the 16"'ers and build it for CMC... this is coming from a guy trying to run AI. 
Posted by: trackbird May 26 2007, 03:49 PM
It's got a splayed main cap 353 with a billet front cap, ARP studs, a crane roller cam, aluminum heads, undercut valves, comp pro magnum roller rockers, a stealth ram and a 6 speed/3.73 combo, I've got C4hd rotors and "1LE" calipers in a box to install and plenty of other stuff (spohn crossmember/torque arm combo, etc). It's way too far gone to back up now.
I've got a set of 1992 wheels that are mostly round (I think they'd be ok for track wheels, but the bead area is slightly not round, but it doesn't seem to have actually bent the wheel) and I've got 4 IROC wheels that I'm going to use for a while then they'll be up for sale.
Posted by: CMC #37 May 26 2007, 05:54 PM
Very cool project, sort of like my '91 Formula! I will give you some crap about the kitty litter - one might say keeping cats and hi-po/race cars are very compatible in a way, eh Mitch? Meow!!!! 
Posted by: Shortcutsleeping May 26 2007, 06:57 PM
Congrats Kevin..
92 Camaros seem to be getting around these days <looks around><shifty eyes>!
Costas
cars and such...
Posted by: Mericet May 26 2007, 09:30 PM
That could take a while. Got a few things of my own to take care of. Still, let me know when you need a hand.
Posted by: nape May 27 2007, 08:17 AM
It's got a splayed main cap 353 with a billet front cap, ARP studs, a crane roller cam, aluminum heads, undercut valves, comp pro magnum roller rockers, a stealth ram and a 6 speed/3.73 combo, I've got C4hd rotors and "1LE" calpers in a box to install and plenty of other stuff (spohn crossmember/torque arm combo, etc). It's way too far gone to back up now.
I've got a set of 1992 wheels that are mostly round (I think they'd be ok for track wheels, but the bead area is slightly not round, but it doesn't seem to have actually bent the wheel) and I've got 4 IROC wheels that I'm going to use for a while then they'll be up for sale.
Nah, it's not too far gone until you start doing stuff like cutting the roof support out for weight...


C4HD rotors work, you'd just have to cut them down to 12".
Anyway, run it as a track car with the bullet, then WHEN you decide to race, give CMC a long think
Posted by: trackbird May 27 2007, 11:08 AM
I'll probably go AV8SS if I run any series. I won't make all of the events, but I might hit the close ones. That might leave me to run AI/AIX from time to time as well. And, I suspect that we'll autocross the crap out of it too.
Posted by: firehawkclone May 27 2007, 03:22 PM
Right on Kevin, looks like a fun project buddy.
congrat's
Posted by: BumpaD_Z28 May 27 2007, 07:08 PM
NICE !!! Can't wait to see it track ready !
Please post pic up of the firewall mods / plate when you delete the A/C and heater ... my A/C is gone but the box and heater stuff is still there.. I think it might be time to get rid of it.....
~DaVe
Posted by: trackbird May 27 2007, 07:31 PM
Please post pic up of the firewall mods / plate when you delete the A/C and heater ... my A/C is gone but the box and heater stuff is still there.. I think it might be time to get rid of it.....
~DaVe
I've done it before, it's easy. Rip it all out, cut plates, seal with sealer (silicone?) and rivet in place. It's not a difficult job.
Posted by: StanIROCZ May 27 2007, 07:45 PM
Nice to have another 3rd Gen-er on the board! Esp nice since it is the Admin 
I like the color of the hood
Posted by: bsim May 28 2007, 05:04 AM
Sweet. Though I am disappointed you're not pointing to CMC.
But I bet if you brought the car to MidOhio in September, the Texas compound could have it fixed up in a day or so!
Posted by: RichJ May 28 2007, 10:04 AM
Third gens are cool. My first car was a third gen Camaro. Now that they are almost emissions exempt in my state, it'd be great to get one and have the freedom to do whatever with the motor legally.
Posted by: WAHUSKER May 28 2007, 01:04 PM
Holley Stealth Ram. It's basically an EFI tunnel ram setup. I guess Holley is selling it as a Weiand piece too, but it's this one:
http://www.jegs.com/webapp/wcs/stores/servlet/product_10001_10002_88790_-1
If you go to the B 100, you should talk to my nav Ellis about his custom work on those intakes. He's fabbed up two of them now & they seem to make some serious power. They even look purdy (after I polish them).
Posted by: robz71lm7 Jun 1 2007, 10:40 PM
Nice...looks like it's going to be a fun project.
Posted by: ws6transam Jun 3 2007, 09:39 PM
Like, when are we going to get our thirdgens together and thrash them?
NFME is dead for '07 so I'm done for, and in need for some driving.
Preferrably June 27th through 29th.
Posted by: trackbird Jun 4 2007, 04:40 AM
NFME is dead for '07 so I'm done for, and in need for some driving.
Preferrably June 27th through 29th.
Can't make it to Nashville? I remember seeing your car at the NFME in 2005, it's a beautiful car and I'd love to get together for some track time. We spent this afternoon trying to fine tune mine, it's getting closer.
Posted by: trackbird Jun 5 2007, 02:04 PM
Well, last night was productive. I was inspired by our stripping of the 24 Hours of Lemons project car on Sunday night and I removed a large portion of the interior of the Camaro last night. The only things in the car right now are the front seats, the carpet and the door panels (which I've just not pulled off yet). Everything is out of the rear, I just have to unbolt the bottoms of the seatbelts and remove them and pull the speakers and speaker wiring to complete the rear section.
I guess I should take a few pics and post them as progress is made.
Posted by: trackbird Jun 7 2007, 03:52 AM
Progress:
The rear portion of the interior is now gone, the rest will be coming soon.

|

|

|
Posted by: trackbird Jun 7 2007, 04:03 AM
The Blaine Fabrication rear spoiler is on the car and we now have rear deck pins to hold the hatch shut.
Picture 58 is where I laid out some (almost straight) lines on the hatch to line up the spoiler.
Picture 60 shows that I laid out the mounting location, then called Alan and then moved it. That explains all off the bolt holes that I have marked out. Oops.
Picture 61 shows that you should use a straight edge to make sure you don't have the spoiler bent, tweeked or otherwise twisted before you mark and drill the holes.
Remove the hatch latch plate and the electric hatch mechanisim, center punch your holes and start drilling (once you've checked and re-checked and are sure that everything is lined up).
Picture 108 shows that the 3rd gen hatch should use 4 long bolts on the hatch (two on each end), but, if you drill through the bottom skin with a #3 Unibit, you can stick a deep well socket in there and use the short bolts. So, that's what I did.
Picture 109 shows the mounting plate and hardware after it's bolted into place.
Picture 110 shows the spoiler once it's been bolted down.
Picture 111 shows where I mounted the rear hatch pins.
Picture 112 is the bottom of the hatch where the pins are mounted.
Picture 114 shows where the pins are in relation to the spoiler.
Picture 119 shows the hatch pins installed and complete.
All of which explains why there is still interior stuff in this car right now. I've been busy doing other things.

|

|

|

|

|

|

|

|

|

|
Posted by: Mericet Jun 8 2007, 12:48 AM
Looks good. I knew you said something about replacing the hood. If you need a replacement, let me know. There's one standing in my barn.
Posted by: prockbp Jun 8 2007, 01:16 AM
nice. looks like you're having a good time
Posted by: trackbird Jun 8 2007, 03:21 AM
If it involves cars and power tools, I'm having fun (though it's often said that no good can come from combining me, cars and power tools, and they might be right).
Posted by: Eugenio_SS Jun 8 2007, 04:25 PM
i even contributed on the weight-savings on the car, as well as breaking a bolt 
Posted by: trackbird Jun 8 2007, 04:27 PM
I gave him a Snap On ratchet that's marked "on" and "off" and he still managed to twist off a bolt.....

On the other hand, that might be the easiest that any of them came off of there. Maybe it was the right way to do it.
Thanks for the help Eugenio.
Posted by: slowcamaro Jun 8 2007, 07:23 PM
x2 Im in Cumberland and have an iroc hood (no louvers) I need to dispose of so if youre ever through and want it let me know. Im looking for an 82-83 z28 fiberglass hood...
Posted by: trackbird Jun 8 2007, 08:28 PM
x2 Im in Cumberland and have an iroc hood (no louvers) I need to dispose of so if youre ever through and want it let me know. Im looking for an 82-83 z28 fiberglass hood...
I'll be through there tonight... But I don't need it.
Posted by: Eugenio_SS Jun 8 2007, 09:25 PM
I gave him a Snap On ratchet that's marked "on" and "off" and he still managed to twist off a bolt.....
On the other hand, that might be the easiest that any of them came off of there. Maybe it was the right way to do it.
Thanks for the help Eugenio.
yeah... should've done the same for the other 3 bolts... lol
too bad i miss most of the fun... we should've done more on the car while we were both there... it's fun.
Thanks for your help on my car too
Posted by: slowcamaro Jun 8 2007, 09:59 PM
x2 Im in Cumberland and have an iroc hood (no louvers) I need to dispose of so if youre ever through and want it let me know. Im looking for an 82-83 z28 fiberglass hood...
I'll be through there tonight... But I don't need it.
Anything you do need?
Posted by: nape Jun 8 2007, 10:13 PM
The rear portion of the interior is now gone, the rest will be coming soon.
Sweet, almost time for spot weld cutters and an angle grinder with a knotted wheel
Posted by: mitchntx Jun 9 2007, 02:24 AM
You planning on keeping a spare tire in there?
Posted by: trackbird Jun 9 2007, 02:19 PM
Nope. I was thinking that I should cut the bracket out (unless there is a good reason not to) as well as many other brackets along the way. I don't have a spot weld cutter, but I probably should look into one. I intend to take out all of the brackets that I can since I won't be needing them.
What do you guys think I can get a stripped 3rd gen to weigh once it's missing all of the extras? Is it possible to get to 2,600 lbs before the cage?
Posted by: nape Jun 9 2007, 05:49 PM
If you're taking side windows and inside guts of the door out, you can get there.
My car is down to 3020 with me (215lbs), 15 gals of fuel (6.5lbs/gal = ~98lbs), and approx 100ft of cage (1.6lb/ft = 160lbs). That puts the car at approx 2550 before me and fuel (with iron heads).
There's a ton of work to get down to that weight though. I stripped my car for over two months before I sent it to the fabricator. Every bracket is gone, all seam filler is gone (over 10lbs), and I even cut 15lbs out of the roof structure.
Posted by: trackbird Jun 9 2007, 10:05 PM
TJ,
Is that with a glass hood or the steel one?
I've already got aluminum heads, but I've got a Stealth Ram intake so there's some extra weight back. I am intending to gut the doors and replace the hood with a lighter glass hood (it has glass, but it's a heavy one). I was going to say 2,500 lbs, but I decided that was too light. I'm starting to think it's not too light.....
Posted by: Blainefab Jun 9 2007, 10:33 PM
Nope. I was thinking that I should cut the bracket out (unless there is a good reason not to) as well as many other brackets along the way. I don't have a spot weld cutter, but I probably should look into one. I intend to take out all of the brackets that I can since I won't be needing them.
There's 35-40# of unused interior brackets - a sawzall will leave 10-20% of that plus ragged sharp edges. The spot weld cutter will get all of the metal out, and leave only minor burrs that are easy to smooth off with a flap disc.
Posted by: mitchntx Jun 10 2007, 02:46 AM
At a local hardware store, I found a carbide drill bit that had a point on it and then cutters on the outer edge.
Not sure if it is technically is a spot weld cutter, but it certainly does a number on them.
Have to be careful not to go all the way through, though. cut a little, pry a little ...
Posted by: nape Jun 10 2007, 03:06 AM
Is that with a glass hood or the steel one?
I've already got aluminum heads, but I've got a Stealth Ram intake so there's some extra weight back. I am intending to gut the doors and replace the hood with a lighter glass hood (it has glass, but it's a heavy one). I was going to say 2,500 lbs, but I decided that was too light. I'm starting to think it's not too light.....
Fiberglass hood, a real flimsy one.
I forgot to mention, the front bumper is made from 1.5" x .083" tubing (I think, can't remember what I ordered). Pretty much a copy of Randy's idea. Rear bumper will be getting replaced when life settles down a little.
A lot of the build pics are in the link to my sig, make sure you look at '06 pics too.
How much fabricating do you want to/can you do? I have ideas on how to remove another 50+ lbs from the front end but not the time or money right now.
PS- lexan in the rear hatch removes 60+ lbs according to a buddy. One of the better $/lb ratios if you're going to spend money, too bad it's off the rear of the car. Not as much of a problem for a road race car vs. an autocrosser though.
Posted by: StanIROCZ Jun 11 2007, 03:08 AM
TJ, do you have a full exhaust or just something short?
Posted by: nape Jun 11 2007, 04:39 AM
Short. It's a 3" Dynomax bullet right on the end of the y-pipe with a turndown pointing out the side of the car. My exhaust hanger is a ~4" piece of 1" x 1/8" AL flat stock bolted to the pinch rail and muffler with 1/4-20 hardware, known as the ghetto hanger.
It's surprisingly quiet (but good) with the stock L98, it's one of the quieter cars on the AI grid. I can't wait to see how it sounds with a real motor.
Pretty much everything has been done for weight.
If it ain't light, it ain't right!
Posted by: sgarnett Jun 11 2007, 03:34 PM
Not sure if it is technically is a spot weld cutter, but it certainly does a number on them.
I think you may be describing a bit designed for glass.
Posted by: trackbird Jun 23 2007, 05:15 AM
Well, I'm still waiting on suspension stuff, so I decided to toss some of the extra weight that I wasn't going to need any longer.
As you can see, it got pretty serious for a little while. I had the dash out and I'd already removed the stuff under the hood (I need to get something to patch the holes with tomorrow).
Quite an impressive pile for a little bit of work.
And, I did bolt the dash back in tonight. I have to tie up or remove some of the stuff that's back there (like the cruise control module, etc) and wrap things up for now. I'm sure that more of it will come out later, but for now, I'm calling it good. At least I can reach things to work on them.
I got a spot weld cutter from eastwood tonight. It seemed to cut well at first, but it didn't take long for me to find a way to dull it (I think), or I just got tired and it seemed dull afterwards? Either way, I'll give it another shot, but I think I might be in search of a better way.

|

|

|
Posted by: nape Jun 23 2007, 06:04 AM
I've never used the Eastwood cutter, but the one from Blair works excellent: http://www.blairequipment.com/Spotweld_Cutters/Spotweld_Cutters.html
#13224 is what I have. You just have to be careful when you flip the cutter over after you break a tooth off. If you squeeze too hard you'll break the cutter. Mildly expensive, but worth their weight in gold over drilling through then having to fill.
Posted by: axoid Jun 23 2007, 10:44 AM
Kevin,
I'm sure your going to trailer the car to distant events, but are you going to use little trailer behind the car for local events? I have an old third gen hitch you can have for free if you want it.
Posted by: trackbird Jun 23 2007, 01:36 PM
I'm sure your going to trailer the car to distant events, but are you going to use little trailer behind the car for local events? I have an old third gen hitch you can have for free if you want it.
Nah, I'll probably just drive it to local stuff. But I've got a draw bar that might fit your hitch that I'm trying to get rid of. Maybe we can make it a set for someone.
Posted by: trackbird Jun 24 2007, 06:50 AM
Patch panels are on the firewall. Autometer shift light is installed where the vent used to be. Autometer oil pressure warning light is installed under the dash. I pulled the heater bypass valve and all of the associated plumbing that was lumped in there with it.
I've still got a lot of work to do.

|

|
Posted by: Shortcutsleeping Jun 24 2007, 12:24 PM
<parts-hound hat = ON>
So...uh...Kevin, it looks GREAT! But I mean really, that ugly old airbag steering wheel, WOW that is ug-LEE...I'm sure you are going to get a nice wheel for it and when you do, just remember, I'm here for you. I'll take that old stock wheel so you don't have to worry about it ANYmore... 
that is, as long as the foam inside it hasnt broken down and made it feel like the outside of the wheel isnt attached to the inside.
Lookin good!
Costas
cars and such...
Posted by: trackbird Jun 24 2007, 02:39 PM
Costas,
That wheel was listed in several for sale threads. It's "leaving", I'm just not sure when. The leather sucks (worn through) and the air bag cover is a bit warped, but it's a real airbag wheel and if it's useful to you, send me a pm and let me know what it's worth and I'll see if a new wheel is in the budget yet.
Posted by: AndyJ Jun 24 2007, 03:15 PM
So...uh...Kevin, it looks GREAT! But I mean really, that ugly old airbag steering wheel, WOW that is ug-LEE...I'm sure you are going to get a nice wheel for it and when you do, just remember, I'm here for you. I'll take that old stock wheel so you don't have to worry about it ANYmore...
that is, as long as the foam inside it hasnt broken down and made it feel like the outside of the wheel isnt attached to the inside.
Lookin good!
Costas
cars and such...
Paul,
Will a wheel out of a '96 work for you? Mine is coming out sometime this winter and it is still real decent.
Posted by: trackbird Jun 24 2007, 03:53 PM
I'm noticing that the kid who originally owned/built this car was a real rocket scientist. The neutral safety switch was jumpered with one of those "golf keys". The little key with two prongs on it (I'm not a golfer, so I don't remember what it's for) and wrapped in electrical tape. The IAT wires have been extended, the ends were tinned with solder and plugged into the connector (just laying on the intake manifold.....you didn't do that did you Mike?). The cruise cut off switch (or clutch switch, not sure which one it was supposed to be) is just tied up under the dash and not installed into anything. The hole he cut for the clutch master cylinder in the firewall is about 50% larger than it should have been and I'm going to have to patch the firewall and make a new hole. It all works ok, but it is a less than ideal job. Other than that, and the random and misc. wires that seem to be everywhere, all is about normal. So, I'm doing a build up and clean up all in one shot.
I'm sure I'll find other stuff as I go along.
Posted by: Mojave Jun 24 2007, 10:58 PM
I'm sure I'll find other stuff as I go along.
Sounds like a 3rd gen to me

Posted by: Shortcutsleeping Jun 25 2007, 01:45 AM
Thanks, but a 96 won't work.
It's a 92, so for FStawk it has to have a 92 wheel in it. B4C2 has a wheel with the middle top all squishy and not really attached to the metal very good and it bugs me.
Kevin, if your wheel is in decent shape (besides wear) and you are replacing it, then let me know. I don't need the airbag, just the wheel.
Costas
cars and such...
Posted by: trackbird Jun 25 2007, 03:19 AM
Now that you mention it, most of them that I've worked on had similar issues in one way or another. Maybe they were factory options to keep the techs guessing???
It's a 92, so for FStawk it has to have a 92 wheel in it. B4C2 has a wheel with the middle top all squishy and not really attached to the metal very good and it bugs me.
Kevin, if your wheel is in decent shape (besides wear) and you are replacing it, then let me know. I don't need the airbag, just the wheel.
Costas
cars and such...
It's in decent shape and I will be pulling it (sooner or later) and it's "yours". It's solid, just ugly.
More progress:
The oil temp and oil pressure gauges are mounted. The oil pressure warning light is installed and hooked up (except it's not hooked to the sending unit because it's not easily reached behind a stealth ram (I'm still working on that part). The gauges even have lights that work and dim with the knob. The shift light is installed and fully functional. I removed the wiring harness that ran from the climate controls to the blower motor and AC compressor, etc. It's all gone and in a pile to sell for scrap. The car still starts, so it doesn't seem to miss any of it. I soldered the IAT wires properly. I moved the wideband O2 sensor display to the air vent above it's previous location and put the two new gauges under the air vents next to the pro lite oil pressure warning light. Oh, and the airbag sensors have been removed (crap, I just realized that I left the SIR warning light in the dash and put the dash panel back on and installed the headlight switch, guess I'll have to pull that apart and remove the bulb....
).And, I forgot the digital camera today, so I have no updated pics for tonight.
Posted by: Mericet Jun 25 2007, 03:21 AM
Even I could not help getting that connector on. Well, at least your project is still running!
Posted by: trackbird Jun 26 2007, 05:31 AM
UPS brought me more toys and Jegs supplied the rest (I had to give them money, but either way, the stuff came from there).
The ground control stuff is here.
The sponsor stickers are making their way onto the car.
The power steering cooler has arrived (and I have hose for it too now).
The steering wheel has been swapped out (Do you hear that Costas?).

|

|

|

|

|

|

|

|

|
Posted by: Blainefab Jun 26 2007, 12:03 PM
#13224 is what I have. You just have to be careful when you flip the cutter over after you break a tooth off. If you squeeze too hard you'll break the cutter. Mildly expensive, but worth their weight in gold over drilling through then having to fill.
McMaster has the same thing for $16 - spare 3/8" cutters are 4093A35 $9.06ea Use a cutting oil, and first put a divot in the middle of the spot weld with a center punch - it will keep the bit from walking around.
Posted by: StanIROCZ Jun 26 2007, 12:23 PM
The ground control stuff is here.
The sponsor stickers are making their way onto the car.
The power steering cooler has arrived (and I have hose for it too now).
The steering wheel has been swapped out (Do you hear that Costas?).
On the front weight jack, is there a thrust bearing between the upper mount and the bolt, or are those just big washers? I assume that it is not bolted tight, since the bolt needs to rotate relative to the mount.
I should have bought the GC kit. I’m having trouble with my rears.
Posted by: trackbird Jun 26 2007, 01:40 PM
It's not bolted tight. But I don't see any signs of a bearing. There might be a nylon piece or something in there. I'd have to look more closely.
Thanks Alan, I'll check them out.
Posted by: axoid Jun 26 2007, 04:21 PM
My set don't have a bearing and were bolted tight when I got them. I assumed that the idea is that the whole hat rotates in the spring pocket. But over time the bolt will lossen up and just the threaded shaft will turn.
Posted by: StanIROCZ Jun 26 2007, 04:59 PM
I tried having the bolt tight on my rear jacks and it got kinda hung up when adjusting. I'm going to try keeping the bolt a little loose but use loctite on the threads.
Posted by: Shortcutsleeping Jun 26 2007, 06:02 PM
Check goes out today!
thanks!
Costas
cars and such...
Posted by: trackbird Jun 26 2007, 06:48 PM
Check goes out today!
thanks!
Costas
cars and such...
I'm glad to help out.
Posted by: slowcamaro Jun 26 2007, 06:58 PM
Thanks Alan, I'll check them out.
If looking more closely entails disassembly..take more pictures. And if you could double check the size estimates posted in the other thread that would be awesome. Thanks for the pictures.
http://www.frrax.com/rrforum/index.php?showtopic=9929
Posted by: trackbird Jun 26 2007, 07:41 PM
I'm not sure what they did for locktite and such, so I'm not planning to disassemble them. Actually, they are cheap enough that I can't justify making a set, but that's just me.
Posted by: slowTA Jun 26 2007, 09:52 PM
Please take pictures once you get the front weight jackers installed.
Posted by: trackbird Jun 27 2007, 07:07 PM
Last night we installed the driveshaft (thanks Pimpmaro for the help) and started on the rear suspension. We hit a few snags and found that the rear LCA bolts were not too cooperative. Bubba353Z (who I bought the car from) is on vacation this week and I must thank him for taking time to run out and locate some proper replacement LCA bolts today while I was at work. Thanks Mike! We did get the rear springs and weight jacks installed. The rear jacks had to be modified to clear the reinforcing "plate" on the PHB end of the axle, Pimpmaro started on this with a bench grinder and then I attacked it with a chop saw. Once the rough cut was done, Garrett (pimpmaro) cleaned it up on the bench grinder. No problem.... We spent the rest of the night staring at the car and finally we worked out the location for the remote oil filter and power steering cooler.
Today, I'm expecting a box full of goodies from hotpart.com. I've got Camber plates coming, I've got their rear LCA's (heim/heim) to go on the car. I've got some shocks coming and I'm picking up one of their new (just released) swedged chromoly heim/heim PHB's. It's not welded and that removes the issues/concerns of welding and heat treating, etc. They simply swedge the end of the tubing down enough to tap it for the rod ends. I've seen photos of it and it looks very well done. I'm waiting on mine to arrive, when it does, I'll take photos and post some pics. I'll post pics of the other goodies after they arrive as well.
Once all of that arrives, we'll have shocks to go with the springs and we can tear the front and rear down and get all of the stuff installed (brake kit, springs, rear sway bar, LCA's, etc). The car is currently on jackstands in my garage and it's prepped for me/us to get to work and see what we can accomplish tonight.
Posted by: StanIROCZ Jun 27 2007, 08:52 PM
You work pretty fast.
Is that swaged PHB steel or Alum? I've been thinking about this. I went with the Aluminum Coleman design but am concerned about the bending/compression stiffness. I can grab a hold of it and it wiggles pretty good. I larger OD would fix that.
I'm planning to work on my PS cooler tonight as well. Where did you decide to place it?
Posted by: trackbird Jun 27 2007, 09:38 PM
8 days to Nashville (give or take), we have to work fast.
It is a Chromoly PHB.
This has been an express "build" to make Nashville and almost everything has arrived here now. I'm still waiting on a radiator from Afco racing and some -10 hose, etc.
Power steering cooler is probably going on the radiator support that runs up the center of the radiator (but out in front of it). That shouldn't impact the radiator function much and should get good airflow. I might move it later, who knows.
Posted by: robz71lm7 Jun 27 2007, 09:39 PM
Is that swaged PHB steel or Alum? I've been thinking about this. I went with the Aluminum Coleman design but am concerned about the bending/compression stiffness. I can grab a hold of it and it wiggles pretty good. I larger OD would fix that.
I'm planning to work on my PS cooler tonight as well. Where did you decide to place it?
In compression and tension the aluminum Coleman bar is more than stiff enough. It's on the order of only a few thousandths more deflection than a steel bar.
Posted by: AndyJ Jun 27 2007, 09:55 PM
I can't wait to check out your car in NVille Kevin.
Posted by: trackbird Jun 27 2007, 09:56 PM
I just hope it's not all still in boxes......

If it's in running shape (even if not done), I'm hoping to shake it down at an autocross this weekend. Just for testing purposes (on hard street tires).
Posted by: Mericet Jun 27 2007, 10:00 PM
Better get there by 7am or you will not get a spot!
Posted by: trackbird Jun 27 2007, 10:29 PM
Better get there by 7am or you will not get a spot!
I'm guessing it's too late to register....
Oh well, if I'm going to make it (and I'm not still up and working on the car at 7am), I'll be there early.
Posted by: axoid Jun 27 2007, 11:32 PM
No. It's still open until 6:00 pm CST tomorrow.
Posted by: trackbird Jun 28 2007, 12:21 AM
No. It's still open until 6:00 pm CST tomorrow.
Sweet.
Struts and front "stuff" is apart.
Back to the garage, more later.
Posted by: trackbird Jun 28 2007, 03:23 AM
Ok, the Hotpart camber plates are artwork, true artwork. This is a new design that allows for extra clearance around the master cylinder. I ran it against the stops and couldn't make it hit the master cylinder. Did I mention that these things are artwork?

|

|

|

|

|

|
Posted by: trackbird Jun 28 2007, 03:27 AM
The shocks arrived (also from Hotpart).
The remote oil filter is mounted (unless I change it, but I think I'm going to try it here first).
The EB Miller brake kit parts came out of the box. We should have them installed tomorrow night.

|

|

|

|

|
Posted by: trackbird Jun 28 2007, 03:33 AM
The rear Koni's and Ground Control springs are in place.
The Hotpart LCA's are ready (with new hardware since the stuff on the car seems stuck) to be installed tomorrow. Pretty, aren't they?
The front suspension is all apart, the stock brakes are off and the new Koni's are actually hanging in the camber plates so we can mate them with the new brake kit/spindle tomorrow evening.
The inside of the car is a mess, it's full of tools and "stuff". I'll clean it up after we get the suspension on.
The KYB's are out (I told you that these parts weren't on the car long, they look about new).
And, I think I'm going to give up racing now that I've read the warning on this box for racing harnesses. Maybe I should change brands (to one that doesn't tell me that I will be injured or killed????). Now that's faith in your product.....

|

|

|

|

|

|

|
Posted by: trackbird Jun 28 2007, 03:37 AM
Photos of the swedged chromoly PHB from Hotpart. I don't have mine yet, but here's what it looks like. I should have mine in a couple days (it's on the way). I'm anxious to lay my hands on it and get it under the car.
|
|
|
|
Posted by: CMC #37 Jun 28 2007, 04:33 AM
Which EB Miller brake kit did ya go with?
Posted by: trackbird Jun 28 2007, 11:15 AM
It was still in a box, my friend had bought it for the car and I got it with the car. It's the C4HD rotor/1LE caliper (basically Ford Cobra brakes) kit. It will work for now, I'll probably upgrade to Skulte Performance's wilwood kit in the future.
Posted by: BumpaD_Z28 Jun 28 2007, 04:10 PM
humm I might have to get some of the Hotparts camber plates for when I tear into the front end for the brake swap.. they do look SWEET !!!!
Posted by: trackbird Jun 28 2007, 04:50 PM
Dave,
I've been around several camber plates (often on Mustangs, but some on 3rd gens) and these are the absolute nicest camber plates I've ever laid my hands on. I haven't seen them all, but the fit and finish on these are as good as any and better than most. I was very impressed when I pulled them out of the box. It's a brand new product from Hotpart (I was expecting the previous design when I ordered them) and so far, I really like them.
Posted by: nape Jun 28 2007, 10:39 PM
Skulte has a Wilwood kit? I've never noticed it on his website.
Posted by: slowTA Jun 28 2007, 10:54 PM
Whew... I'm not an idiot since I couldn't find it!
Posted by: CMC #37 Jun 28 2007, 10:58 PM
Andris, we'd love to hear the details, please start another thread!
Posted by: trackbird Jun 28 2007, 10:59 PM
There's a thread around here where Andris just put 4 piston Wilwoods on his 3rd gen. I'm not sure it's a kit, but he did one for him and I was trying to talk him into making me some brackets to do mine. Maybe I should put it that way......
Posted by: trackbird Jun 28 2007, 11:00 PM
Andris, we'd love to hear the details, please start another thread!
Geez Jules, you're getting slow.....
Here's the thread:
http://www.frrax.com/rrforum/index.php?showtopic=9467
Posted by: CMC #37 Jun 28 2007, 11:14 PM
Andris, we'd love to hear the details, please start another thread!
Geez Jules, you're getting slow.....
Here's the thread:
http://www.frrax.com/rrforum/index.php?showtopic=9467
 At least I am in good company!
Posted by: trackbird Jun 29 2007, 04:48 AM
The good news is that most of the rear end is back together. I'm just waiting on the PHB which should arrive very shortly. I have to thank Garrett (Pimpmaro) for handling that job while we worked on the front end.
Garrett with his two favorite tools, a hammer and a screwdriver. Neither of which fit the rear suspension as I remember..... 
When you install the weight jacks, the flat side goes up and the pigtail goes into the slot in the control arm.
Then, make sure you line up the notch (weld "bump") with the gap in the spring.
Stack it like so...
Slide it up into the spring perch.
And, lift the control arm into place with a small jack.

|

|

|

|

|

|
Posted by: trackbird Jun 29 2007, 04:56 AM
We had some trouble with the EB Miller brake kit and we're waiting to hear back from Ed. The PAB was hard into the rotor on both sides. It seemed that some washers were missing from the kit. We made some spacers for now, but I'm not real thrilled with it, so we'll see what Ed says. Either way, the front is all back together (including the sway bar).
And, in a moment of brilliance, I decided to screw the oil temp sender into the remote filter housing before anything fell into the filter. I'm glad it only took me two days to figure that out..... 
Tomorrow evening we bleed brakes and I see if I can get it aligned on Saturday. If so, I think it's going autocrossing Sunday as a shakedown.
Afco shipped my radiator with a built in oil cooler today. I hope to have it soon so I can get the oil lines made up. I also received my 3 quart accusump and mounting hardware. However, I ordered a regular manual valve and then ordered the remote valve kit that Alan Blaine showed us, so I've got a spare manual valve is anyone needs one. I'll get pics of those parts and post them in a later update.
And, does anyone know where to get extra C (or E) clips for the calipers used in this kit? I'm sure I'll lose more than one and I'd like some spares.
Off to bed!

|

|
Posted by: CMC #37 Jun 29 2007, 05:02 AM
Schweet! I'm really enjoying your project here Kevin! Thanks for sharing it with us....makes me pine away for the '91 Formula. 
Posted by: trackbird Jun 29 2007, 05:14 AM
Thanks Jules. I'm enjoying it, but 2 weeks of crunch time for Nashville is starting to catch up with me. I'm getting a bit tired from (tired from, not tired of) all of the late nights in the garage. Oh well, as long as we're making progress, we'll keep moving forward. It's still fun, just tiring fun....
We actually rounded up all the tools we had scattered everywhere at the end of tonights work. They are piled into two buckets so I can sort them into the tool box first thing tomorrow. We've got too many guys working on too many parts of the car and I own too many tools, so we had stuff everywhere. I hate working in a mess (though my garage is a trashed as it's ever been right now), so we decided we had to at least find the tools.
Oh, and Garrett installed the Hotpart LCA's tonight, but I forgot to take pics of that part. I'll get them tomorrow if I remember.
I wasn't sure if anyone would really care about this old car/project, but I'm having fun and trying to remember to take some pictures while I'm at it. And I hate to waste the pictures once I take 'em, so I started stuffing them in here.
And, AFCO is sending me a radiator pressure loss warning system. If the hose pops off, the light comes on. That would have saved us a couple motors on the AV8SS car over the years. I also bought an Autometer Pro Lite warning light (full sized) to replace the small one I hooked up as an oil warning. I want to make sure I see that thing, so I'll use the bright one instead. I'm sure there's more, but it's late and I'm beat.
Now I really am off to bed.
Posted by: pimpmaro Jun 29 2007, 05:38 AM
Hey, I didn't realize that was a candid camera shot! And for your information, the hammer fit quite nicely, thank you very much. After all, I did learn from you. 
Garrett with his two favorite tools, a hammer and a screwdriver. Neither of which fit the rear suspension as I remember.....
When you install the weight jacks, the flat side goes up and the pigtail goes into the slot in the control arm.
Then, make sure you line up the notch (weld "bump") with the gap in the spring.
Stack it like so...
Slide it up into the spring perch.
And, lift the control arm into place with a small jack.
Posted by: Mojave Jun 29 2007, 12:06 PM
I can't help you there, but those damn E clips are one of the reasons I put C5 brakes on my C4. I HATE dealing with those stupid clips!
Posted by: trackbird Jun 29 2007, 01:28 PM
I can't help you there, but those damn E clips are one of the reasons I put C5 brakes on my C4. I HATE dealing with those stupid clips!
I don't suspect that this brake kit will be here too long. I'm planning to swap to something else at some point. For now, it's here, so I'm using it.
Posted by: slowTA Jun 29 2007, 03:15 PM
The Ed Miller brakes require a thicker mounting bracket if you go from his 12" kit to the 13" kit instead. The difference in thickness couldn't be made up with a thicker bracket since the new thickness is not a standard for bars stock. I originally bought the bracket for 12" C4 brakes then changed my mind so I would have to come up with a 1/8" spacer to make up the difference. The different caliper carriers from 12" to 13" do not account for the needed space.
I would have an answer for you but it turns out the C4HD setup wont fit inside my lightweight 16" rims... so I didn't bother. I'm looking for different brakes too!
Posted by: trackbird Jun 29 2007, 04:16 PM
This was purchased as a 13" kit, but it just doesn't line up quite right. I hope to have an answer from Ed tonight.
Posted by: trackbird Jun 29 2007, 09:48 PM
The swedged chromoly PHB arrived from Hotpart.com today. It's not heavy (I don't think I have a way to weigh it accurately) and the work looks to be very well done. It uses the same rod ends and similar spacers to the control arms that they make (and I already pictured). Here are the pics:

|

|

|

|
Posted by: trackbird Jun 30 2007, 06:21 AM
More photos:
The rear suspension is completely assembled now.
The torque arm was already on the car, and that's my Lingenfelter driveshaft that I kept from my other car.
The Hotpart PHB is installed now.
The car already had welded SFC's on it. They are stitch welded down the pinch weld already.
I had to do a lot of adjusting to the front ground control stuff to get the ride height back where I needed/wanted it to be. I wound up with 1000 in lb front springs and 3/4" of the adjuster rod showing out of the bottom of the weight jack (I didn't take a pic of the final ride height).
Tomorrow I hope to get it aligned. On Monday I should have a radiator/oil cooler so I can start on the oil system.
Off to bed. I have to be at an appointment at 9:30 am and it's a 45 minute drive from here. It's a bit before 2:30 right now.

|

|

|

|

|

|
Posted by: nape Jul 1 2007, 04:25 PM
You'll like the 1000lb/in'ers on a track car. I think I'm about ready to jump to a higher rate though now that I'm driving the car harder.
Posted by: trackbird Jul 1 2007, 09:51 PM
Well, I took it autocrossing today. We had it to where I was sure I wasn't going to blow anything up and 92 Voodoo (here on frrax) was here to visit from NYC and we decided it sounded like a good idea.
Last night, we tossed a passenger seat in the car so we could ride along. We installed a lap belt so we'd stay put. We swapped to the old Goodyear Eagle HP tires that came on the car (380 tread wear and 5 years old or so) for the event. I didn't want to tear up the new tires that I bought for Nashville. I installed the ECM into the factory bracket and had the prom fall out and land in my hand (that's not good). So, after some trial and error and a trip to moates.net, we got the prom in and working. We test drove the car and started to bed the brake pads. We had too much brake and couldn't really do anything to bed them. Oh well, they'll be bedded after the event (and they are). By now, it was 3 am by that time and I was off to bed....no problem (I had to get up at 5:30 to pick up Bill/92Voodoo for the event).
2.5 hours of sleep....check.
We found that the car has way too much power for street tires. Full throttle in 1st or 2nd results in giant amounts of wheel spin. So, the car seemed civilized and reasonably balanced, but we have a big deficiency in the grip department.
The final (for now) suspension setup is:
Hotpart Camber plates
Ground Control weight jacks with 1,000 in lb springs
Energy suspension poly bushings (front a arms)
Suspension techniques 35mm sway bar
Koni SA's (front)
5.0 castor
-1.8 camber
0 toe
Rear hotpart LCA's
Hotpart PHB
19mm sway bar
Koni SA
Ground Control weight jacks with 225 in lb springs
The car seemed to be reasonably balanced. However, it was hard to tell since every touch of the throttle overwhelmed the rear tires. I only looped the car once, but I took out the timers when I did it (Axoid said he got pictures and will be posting them soon). Overall, we ran decent, nobody died and the car was a handfull if you used a bunch of throttle.
During the last run, the temp got up to 220 degrees and it wouldn't cool down. On top of that it was going lean, very lean and would sometimes bounce to a bit over 220 degrees. So, when idling didn't cool it, we made a run and took it for a drive. That did the trick. However, now it's running poorly, it goes rich, then really lean, then rich, etc. I'm guessing it's a sensor, or I'm hoping.
And, we finished the event with gear lube all over the inside of one rear wheel. I've got to check that one out in the next few days and see if it's a leak, and, if I feel like fixing it.
I ran today as a shakedown run to make sure nothing broke or fell off, nothing did, but we have some leaks and other issues.
We'll see if I feel like fixing it before Nashville......
I'm going to get some sleep and I'll update later.
Posted by: nape Jul 1 2007, 10:42 PM
It's an axle seal. I'd fix it before Nashville, they only get worse.
Posted by: trackbird Jul 1 2007, 11:37 PM
It's an axle seal. I'd fix it before Nashville, they only get worse.
The axle was just rebuilt (moser axles, Eaton posi, 3.73's, solid pinion spacer, etc) before I bought the car. My friend took it to a shop and paid way too much money to get it all redone. It's survived a few hundred street miles and then an autocross killed it? Hmm.
I know I need to fix it, I'm just wondering if I'm going to fix it and take it to Nashville or just drive down there and leave the car here. At this point, I've got lots to do and I'm down to a few days. I have to tweek the tuning, change radiators, make oil cooler, remote filter and accusump lines, fix an axle seal, install a cooling system pressure loss warning system, etc. That's a ton of work for a couple evenings and the 4th of July (I'm off that day), that's my concern.
We also saw my low oil pressure light blink on a few times. The car makes about 55 psi at idle and the switch is set for 30 psi. So, it looks like we were momentarly starving it of oil, even on street tires. If we didn't have the light, we'd have never known, but now that we know, I'm glad I ordered a 3 quart accusump. We added a quart of oil that I got from one of the guys at the event and we saw the light much less (6 quarts in a 5 quart pan), but I was amazed that we made enough grip to starve the engine on beater street tires.
Also, there is enough play in the rear end that the rear rotors are contacting the PAB's and grinding big areas into the rear rotors. I'm not sure what to do about that one.....
Posted by: nape Jul 2 2007, 03:17 AM
Time to trim the list down to what you need.
The way I see it, here's your list:
-Tweak tuning
-Make accusump lines
-Fix an axle seal.
If you have time, then tackle the others. If the car gets hot, short shift it. I'm still running my stock radiator and so are a couple of other 3rd gens in the NASA Midwest region. The key is ducting the air to it. I've seen 230* more often as I learn to drive the car harder, but if I back it down a second or two a lap, the car will cool off.
Here's some words of advice that my dad always has to remind me: Even if you have to baby the car a little bit, take it down there and enjoy driving it. If you don't, the car is just a chore that you don't get to enjoy. This is supposed to be fun, they sure as hell aren't paying ya!
Posted by: Glenn98ZM6 Jul 2 2007, 03:50 AM
1.8 camber going to be enough? most CMC guys are around 3 or so on a 3rd gen.
Posted by: trackbird Jul 2 2007, 11:23 AM
That's where I ran out of adjustment.....
Glenn, I haven't looked at the rules, but can you cut the shock towers for strut clearance in CMC? If I go with much more negative camber I'll have the struts bottoming against the opening for the camber plate (the fender opening). Unless I cut it back....
Posted by: jpastorius Jul 2 2007, 12:55 PM
How do they manage that much camber in a 3rd gen? This has been a very interesting read. It has reinforced my desire to upgrade the car with a set of good gauges.
Posted by: trackbird Jul 2 2007, 01:50 PM
The way I see it, here's your list:
-Tweak tuning
-Make accusump lines
-Fix an axle seal.
The oil filter adaptor I have is not a sandwich adapter. So, I have to make lines to the remote filter and the accusump. I hate to waste -10AN line to make lines twice, so the radiator must go in (and I need to flush the coolant out of the block). So, those things are a given. I'll install the oil temp gauge and the mechanical pressure gauge to those hoses when it's all done. So, that's all going to be done before I leave (if I take the car).
I'm going to swap the mini pro lite warning lite to a full size (shift light size) warning light for the oil. It was tough to see the small one and I feel that oil pressure is a little too important to miss. So, I have the light, I just have to solder it in and bolt it to the dash.
The axle seal needs done, but I think it's just going to leak again. I have a feeling that I'll be looking for a 9" real soon for this car.
At minimum, order an autometer 15 or 30 psi oil pressure warning light and a pro lite (I've got a 30 psi in the car and I just bought a 50 psi switch as well). Screw it into the oil passage by the distributor. Ground one side of the sender, hook the ground side of the light to it and put +12v on the pro lite. It's simple and the sender and pro lite will cost about $60 total. It's cheap and I was amazed to see it flashing while autocrossing on street tires. At one point, I turned after the shutdown area to come back to get my timeslip and the light came on for 1-3 seconds (solid). I had slowed and just hooked the turn at the end, and I wasn't going very quickly when I did it. That was even after I added a quart of oil. The stock gauge will not catch the stuff that the light was showing. The gauge would barely move in that time, but the light will blink and let you know what's going on. I'm adding an aftermarket mechanical gauge as well (as a back up), but the light is well worth the money based on my limited experience.
This is starting to feel like the very beginning of a rather steep learning curve.
Posted by: StanIROCZ Jul 2 2007, 04:16 PM
That's where I ran out of adjustment.....
Glenn, I haven't looked at the rules, but can you cut the shock towers for strut clearance in CMC? If I go with much more negative camber I'll have the struts bottoming against the opening for the camber plate (the fender opening). Unless I cut it back....
agreed. Also, the strut body will start to hit the body/innerfender (whatever it is called) near the k-member at full droop with the wheels turned. You can fix that with a BFH though.
edit to add "with wheels turned"
Posted by: Glenn98ZM6 Jul 2 2007, 04:29 PM
i don't know the legality of those in CMC. i just know your going to dislike 1.8 neg camber on that car.
Posted by: trackbird Jul 2 2007, 05:44 PM
I understand that part. My point was that my Koni will not clear the stock opening in the fender under full compression (unless it doesn't get up to that opening, but I think it will) with much more camber (and I ran out of "slot" at -1.8 on my car on one side, -2.4 on the other).
When I tear it back down, I might slot it (if it's legal for where I decide to play with it, once I sort that out) for more adjustment.
Posted by: Shortcutsleeping Jul 2 2007, 07:41 PM
Just as a datapoint, when we ran ASedan and got to over 1000in/lb (and beyond) springs the camber the tires wanted (gs-cs') ended up being less than -2.0 and we ran soft-side out. Stiff side out wanted even less.
Just fyi.
Costas
cars and such...
Posted by: trackbird Jul 2 2007, 10:46 PM
Thanks Costas! I appreciate the info. Since I had no idea where it would wind up, I didn't slot anything. Now that I know, I'll try it and see what I find out. If I like it, it stays, if not, I guess I'll have to change it. I guess that's why we call it testing. Since this thing is all new to me, I had to start somewhere (right or wrong).
The radiator is here, pics to come.....
Posted by: Mericet Jul 3 2007, 01:53 AM
You forgot to mention that foreign guy in the slow diesel that beat you!
Good to see you running again and I hope you get all the issues sorted out before the weekend!
Posted by: trackbird Jul 3 2007, 04:37 AM
Good to see you running again and I hope you get all the issues sorted out before the weekend!
Foreign guy.... He seems normal enough, but he has a funny accent and drives a VW TDI Golf. I think he was faster when he was piloting a Camaro.....
I replaced the axle seals tonight with the help of Axoid (Thanks Bill!!!), we'll see if it's still leaking. Other than that, not much was done, but I got a delivery of fresh parts today....
On to the good stuff. UPS brought me more toys today.
Prototype valve covers from Canton
Canton power steering fittings
Canton remote accusump valve kit
A custom Afco radiator
An Afco radiator pressure warning system (if it loses pressure, it turns on a light)
Some Afco radiator caps (16 and 22 lb)

|

|

|

|

|

|

|

|

|

|

|
Posted by: trackbird Jul 3 2007, 04:50 AM
Here are photos from the autocross debut.
This is where I ran out of talent..... (being on 380 treadwear street tires didn't help, but I screwed up bad)
There are other photos, but Bill (Axoid here) did such a nice job catching my little mistake, I figured I'd share his work.
We accomplished what we set out to do, we shook down the car and found some issues. That was the main goal for the day. We even had a bunch of fun in the process.
And I know that some of you will be really surprised to see me going backwards at an autocross event....

|

|

|

|

|

|

|

|
Posted by: z28tt Jul 3 2007, 12:55 PM
Is that using the http://www.colemanracing.com/catalog/product_info.php?products_id=9407?
"Lightweight 1" O.D. steel tube
3/4" right and left hand thread
Gold irridite finish
Custom lengths available
.072 wall thickness"
I've got a global west PHB and LCA's with poly ends that I've been meaning to upgrade to rod ends (I'll probably go with QA1 XMR rod ends, but they aren't cheap).
Posted by: z28tt Jul 3 2007, 01:05 PM
Prototype valve covers from Canton
Those look like the same cast alum centerbolt valve covers that Mark Frouhar (from NFME) had on his '85 TransAm.
It looked similar to http://store.summitracing.com/partdetail.asp?autofilter=1&part=BSP%2D95829&N=700+302162+4294903281+115&autoview=sku, but I'm not positive.
He had to majorly clearance the inside bosses to clear the rocker arms, and they all ended up cracking at the corner of the clearance notches against the centerbolt tube. If you've got the short-rail AFR heads, you'll have lots of oil going out the left side breather clockwise tracks. We TIG'd a 3" riser to the top of the valve cover at the front, to get some clean oil-free air for the AMW air:oil separator catch can breather setup.
Are the canton's stock height, or taller?
Posted by: trackbird Jul 3 2007, 01:06 PM
"Lightweight 1" O.D. steel tube
3/4" right and left hand thread
Gold irridite finish
Custom lengths available
.072 wall thickness"
I've got a global west PHB and LCA's with poly ends that I've been meaning to upgrade to rod ends (I'll probably go with QA1 XMR rod ends, but they aren't cheap).
No, Hotpart is a full machine/fabrication shop. I originally thought they were reselling Coleman stuff, but after working with Brian out there and through our discussions, I've learned that they manufacture all of their stuff in house (except rod ends and such). This is a chromoly bar and by swaging it, you don't have to weld on it. That elminates all of the worry about normalizing, etc. And, I can pretty much do pull ups on this bar, it's that rigid. I ran aluminum for a long time and I agree that it seems to work just fine, but this isn't much heavier and it sure seems stout. Anyway, my information is that it is not the Coleman bar, but they could be similar.
Posted by: trackbird Jul 3 2007, 01:12 PM
Prototype valve covers from Canton
Are the canton's stock height, or taller?
I've got Moroso centerbolt covers on the car now and they clear the Comp Cams Pro Magnum roller rockers. I found a deal on these and was thinking of having AN fittings welded on to them for breather tanks, etc (assuming that they fit). Canton listed them as "medium" height (as I remember). I bought them as an experiment. I have to track down hardware first, then we'll go from there. Or, I sell them on TGO and likely get my money back.
I currently have no clue if they'll fit or not. If they do, I'll sell the Moroso's and make a few bucks on the deal (or I'll try).
Posted by: CrashTestDummy Jul 3 2007, 02:37 PM
Cool, you got the finish lights. That'll show 'em! If you're going to screw up, do it in a spectacular way.
So other than the special fittings, what is special about the radiator? Just curious.
Posted by: hotpart.com Jul 3 2007, 02:55 PM
Is that using the http://www.colemanracing.com/catalog/product_info.php?products_id=9407?
"Lightweight 1" O.D. steel tube
3/4" right and left hand thread
Gold irridite finish
Custom lengths available
.072 wall thickness"
I've got a global west PHB and LCA's with poly ends that I've been meaning to upgrade to rod ends (I'll probably go with QA1 XMR rod ends, but they aren't cheap).
Ours are not the Coleman piece and I would not recommend using the Coleman piece. Because of the long length we decide to make our panhard rod from 1.25" x .095" chrome-moly to avoid any deflection. The Coleman piece is using a small 1" OD, very thin wall tubing, and is made from mild steel.
Posted by: CMC #37 Jul 3 2007, 03:07 PM
Everyone should look at Hotpart. You guys do things right! Kudos to you guys Brian!
Kevin, the timing light killer 
Posted by: trackbird Jul 3 2007, 03:41 PM
The large fittings are for an oil cooler. It has a built in oil to water cooler for the engine oil. I added a fitting for a water pressure switch. If a radiator hose blows off, the light comes on. We've lost two motors in the AV8SS car due to such issues. We had a freeze plug pop out of a head and didn't get black flagged for 2 laps (that engine pretty much melted). We also had a water neck crack and the "bump" that retains the top radiator hose and the bump was missing, and so was that end of the hose. The temp gauge was in an air pocket and still had a reasonable reading. We ran 3 laps at Beaver Run without water that time and damaged a bunch of expensive stuff. I then decided a pressure switch was a good idea for my own car.
So, it's basically a 650 hp rated radiator with a built in oil cooler. It just saves me an oil cooler thermostat and finding a place for the oil cooler that doesn't block airflow. Besides, those guys build nice stuff.
And, they built it to my measurements to fit my car (boy I hope I can use a tape measure....guess I'll know real soon ).Is that using the http://www.colemanracing.com/catalog/product_info.php?products_id=9407?
Ours are not the Coleman piece and I would not recommend using the Coleman piece. Because of the long length we decide to make our panhard rod from 1.25" x .095" chrome-moly to avoid any deflection. The Coleman piece is using a small 1" OD, very thin wall tubing, and is made from mild steel.
I'm glad you dropped in Brian. I was going to mention that I thought that was larger than 1" diameter, but since I didn't mic it and I wasn't near the car, I wasn't 100% sure.
Hotpart's prices are very reasonable for the quality of parts they build (Heck, their prices are reasonable for parts that aren't as nice as these are, getting stuff that's this well built is a bonus). I know Julie has worked with them on her cars as well and had a great experience. Their stuff has been truly top shelf. Talking to Brian will let you know how much he truly cares about these designs (and we've been on the phone many times so far). The tolerances they use on thier taps, the fit and finsh and such are truly first rate.
There are lots of places to buy good quality parts, some are more well know than others, but add Hotpart to the list of stuff that's very worthy of your consideration. This is just based on my experience with their stuff (which I'm doing my best to document here with everything else).
I was just glad I didn't manage to kill the timers. I've seen more than a few of those get broken after being punted. I thought I got it with the tail, but I just bumped it (hard) with the nose.
1992 Z28: Kills timing lights.....DEAD.

I also spent about 1.5 - 2 hours on the phone with Afco working out the radiator details. Rodney Bremmer was who I worked with out there and he was truly a professional (and quite patient).
Tonight.... It's the radiator, accusump and oil system show. Tune in for the next installment, coming soon to a thread near you!!!!
Posted by: trackbird Jul 4 2007, 05:19 AM
Well, it's not looking good. We fought with the radiator for quite a while to get it to fit (using a few large hammers). Once we made room, the oil cooler fitting is a very tight fit with the power steering. So, we now need to hammer the floor a bit flatter so the radiator can lean back. It was getting too late to hammer on it tonight, so we have to do that tomorrow. Then we have to make all of the lines for the oil cooler, remote filter and accusump. We then worked out where to mount the accusump. There's a chance we could get it all back together tomorrow, but it's going to be real close.
We did a fair amount of hammering to get the radiator to fit but the oil cooler fitting is just where we don't want it to be (they built it to my specs, so there's nobody to blame but me and I'll get it in there).
A little hammering here, a bit of cutting there and "poof", we almost have a radiator.....

|

|

|
Posted by: AndyJ Jul 4 2007, 05:35 AM
Kevin,
I wish I had your energy. What is it? From zero to race car in 3 weeks???? You are gonna be toast by Friday.
I am IN Tennessee BTW. Northwest corner visiting my 94 year old Grandmother. Gonna fill up on that good West TN bar b que and cold beers for the 4th and worry about all those kids over in the Desert that are going to miss out on this Holiday.
Posted by: trackbird Jul 4 2007, 06:32 AM
I wish I had your energy. What is it? From zero to race car in 3 weeks???? You are gonna be toast by Friday.
I wish I had my energy (I'm already toast
). I've been in the garage every night for a couple weeks now. I've accomplished a bunch, but there's a lot of work to do tomorrow and I'm not convinced that we can get it done. On top of that, we have a tuning/computer issue that showed up after Sunday's autocross. We can't fix it until we get a radiator in the car and I'm running out of time. So, unless a miracle happens tomorrow (which is always possible), I'm guessing that I'm coming down to Nashville without a car. That still could change if tomorrow goes well. I need to:
Mount the radiator (I really need some metal and a brake to bend up a bracket, but I'll mod the stock one for now)
Buy an electric cooling fan (I don't think the stock ones are going to fit)
Install the oil filter "plate" (so I can hook AN lines to the block)
Install (bolt down) the accusump
Run the remote accusump valve cable
Make up all of the AN lines
Hook up the electric oil temp sender
Hook up the mechanical oil pressure gauge
Install a mechanical water temp gauge
Mount the power steering cooler and hook up the lines (the lines are installed, I just need to cut them off at the cooler and hook them up)
Retune/trouble shoot the car
Based on that list, I'm going to guess that you'll see me without my car for this event. But anything can happen around here.
Make all of the -10 AN lines to connect all of it
Posted by: AndyJ Jul 4 2007, 01:00 PM
Come on down regardless Kevin.
You know we are going to have a blast!
Posted by: mitchntx Jul 4 2007, 01:27 PM
You guys have fun.
Have a beer for me, OK?
Posted by: trackbird Jul 4 2007, 02:03 PM
Have a beer for me, OK?
Just one? This project is starting to call for "many".
Posted by: CrashTestDummy Jul 4 2007, 07:22 PM
That lower oil cooling line connection is going to be 'interesting'. ;-)
I was interested in the radiator as the new unit in our 92 B4c does okay, until you turn the a/c on and sit in traffic. Even with both fans hot-wired to run continuously, the car still goes north of 220 in traffic. Because of that, I usually don't use the a/c much. Makes for uncomfortable commutes home in the afternoon, especially if it rains.
And, I'm probably going to need a dual-pass radiator for the Firebird when the new engine goes in.
Your project looks like fun. Too bad you don't have the additional time to clean things and make them all look pretty. Still, considering the time you don't have the project is looking good.
Posted by: trackbird Jul 5 2007, 12:44 AM
Install (bolt down) the accusump
Run the remote accusump valve cable
Make up all of the AN lines
Hook up the electric oil temp sender
Hook up the mechanical oil pressure gauge
Install a mechanical water temp gauge
Retune/trouble shoot the car
Based on that list, I'm going to guess that you'll see me without my car for this event. But anything can happen around here.
It was a challenge, but it's actually going to work just fine in the end.
This didn't turn out to be a drop in unit. I measured it all, but I apparently can't use a ruler. It needed to be about 1/2" less wide and/or 1/2" less tall. However, we got it in there.
It's been fun, but it's been a ton of work. And pretty is over rated.....
Anyway, the radiator is installed, the power steering cooler is installed. I could go make up AN lines and make this thing run tonight, but I'll not get the Accusump in it in time. And, since we have a tuning issue, I'm not going to push it. I'm going to go to Nashville without my car.
Anyway, the radiator was a snug fit, but some work with a hammer made it all work out. It took a "bunch" of banging to get it all in there, but it's in there. It even looks like it wasn't too much work (by the look of the final result).
In the short term, I hung the power steering cooler on the front of the radiator. I don't like doing that, but I figure I have enough radiator at this point that I should be able to get away with it for a while.
The fitting did clear the power steering, but it was tight (and this car has no AC). And the drivers side fan is rubbing the tank (we've not run the fan that way, but we saw it). I'm going to make a spacer for the top and set it back until it clears. That should take care of that (I hope).

|

|

|

|

|

|

|
Posted by: Shortcutsleeping Jul 7 2007, 11:31 PM
<sorry for the hijack Kevin>
Gene,
You likely have another problem. These cars were run in Texas all their life with donut-smackin, fried-chicken-finger-licken boys behind the wheel and I guarantee they never turned off the AC. Check that your system is holding good pressure (cap? pinhole?) and make sure no debris (I find plastic grocery bags really LIKE to get sucked into mine) got sucked into the cavity and is blocking the condensor/radiator. It is easy to undo the top of the radiator and lean it back and use an airchuck to blow all the crap back outta the front of the condensor. Maybe weak water pump?
Miss B4C does fine (had an issue with a pinhole leak in the t/b coolant hose that NEVER made a drip to the ground but kept temps warmer than normal especially as you describe) and b4c2 will get the ac charged here pretty quick. Matt said he had to charge it every year or so. I'll likely be doing a compressor on it soon (happy joy fun).
<unhijack>
Got the wheel today Kevin, thanks!!!
Costas
cars and such...
Posted by: 27Cam02 Jul 8 2007, 11:59 AM
Nice program ..
have you blast time at AV8SS Open Track on your Teal Camaro? Beat Corvette #5?
Posted by: CrashTestDummy Jul 8 2007, 07:06 PM
<Sorry, hijacked again>
I've checked all that. In fact, the car ran significantly cooler after replacing the radiator, (although it wasn't a factory B4C radiator, they aren't available any more), and, iirc, one of the cooling fans. The car runs about 160 most of the time, except when sitting in traffic, when it can go north of 220 deg. Once we get going again, it cools back down albeit slowly. Unlike our 9C1 and Impala SS, though, there is NO way the thing will just sit there at idle with the a/c going and not overheat. Cap has been tested, thermostat has been replaced, hoses have been replaced and everything. The car runs great, and other than just that little issue of running warm in traffic, it is still a blast to drive.
Back to your regularly-scheduled conversation about 92 Camaros.
<sorry for the hijack Kevin>
Gene,
You likely have another problem. These cars were run in Texas all their life with donut-smackin, fried-chicken-finger-licken boys behind the wheel and I guarantee they never turned off the AC. Check that your system is holding good pressure (cap? pinhole?) and make sure no debris (I find plastic grocery bags really LIKE to get sucked into mine) got sucked into the cavity and is blocking the condensor/radiator. It is easy to undo the top of the radiator and lean it back and use an airchuck to blow all the crap back outta the front of the condensor. Maybe weak water pump?
Miss B4C does fine (had an issue with a pinhole leak in the t/b coolant hose that NEVER made a drip to the ground but kept temps warmer than normal especially as you describe) and b4c2 will get the ac charged here pretty quick. Matt said he had to charge it every year or so. I'll likely be doing a compressor on it soon (happy joy fun).
<unhijack>
Got the wheel today Kevin, thanks!!!
Costas
cars and such...
Posted by: trackbird Jul 9 2007, 12:27 AM
..have you blast time at AV8SS Open Track on your Teal Camaro? Beat Corvette #5?
Hey Dusty, it was great to meet you and your girl friend (Mitzi, wasn't it? I'm terrible with names)!!! I'm glad you made it out to the track to visit.
I did get the car out for two sessions. I'd be getting ahead of myself if I give the update here. When we left this thread, the car had no oil cooler lines and I was leaving it at home.
I was up until 2am on Thursday night making 10AN lines for the oil cooler and remote filter. I put them all together and found that the Moroso oil line adaptor was leaking at the block. I tightened it down, it still leaked, snugged it more, still leaked, etc. Moroso didn't send torque specs and I wasn't sure how much I could lean on the bolts. I snugged it a final time and decided that it was too late to fire up the car again and I went to bed.
At 6:30 AM my phone rang. It was Brad (Brad and Liz post as 4manracing here on frrax) asking if I needed the trailer and saying that he'd drive 30 miles to drop it off if I did. While he was here, I started the car and he said that it was no longer leaking. I checked and he was right. I set the car down and started packing the garage (which was a complete disaster and all landed in boxes in utter disarray). We got rolling about 11 am and made the track at 6:30 or so.
I'll try to get some pics of the plumbing and add them to this thread soon.
I'm off to get dinner, my wife is staring at me and waiting on me to put the laptop down and get some food.
I'll finish up later.
Posted by: trackbird Jul 9 2007, 02:49 PM
Anyway. I installed the hose to the mechanical oil pressure gauge on Friday night. The line really didn't reach the remote oil filter location very well, but we hooked it up. On Saturday morning, I had to go install an ignition box into the Darkhorse Racing Mustang and left Garrett to move the oil pressure fitting to the input side of the block adaptor for me.
We learned that we lose 4 psi of oil pressure through the filter, cooler and lines. It went from 62 psi at idle to 58. It also went to almost 90 psi with a blip of the throttle. This told us that the stock gauge is worthless. It shows about 50 psi all the time. 45 on the low end and about 56 on the high end. The autometer shows 58 at idle and almost 90 with RPM. We also got the oil temp gauge working. I hooked it up late and swapped two of the connectors. That gave us oil temp (which was useful). I had also hooked up a mechanical water temp gauge. It proved that the stock 3rd gen gauges are worthless. The 3rd gen gauge showed "160-ish", "220-ish" and "240-ish". The autometer showed 140-242 in actual operation. When the autometer was showing 230+, the stock gauge was still at 220. It seems to be a 3 position gauge in the factory cluster and it is about as useful as the oil pressure gauge.
Anyway, the car was running 242 degrees on track but would cool off as soon as I dropped back for a lap or so. So, the radiator is getting air, but not enough. The oil temps (pre cooler) were pegged at 300 degrees. I don't have a fitting to allow me to take a temp after the cooler, but I probably will soon. We removed the thermostat (as recommended to me by Afco racing who built the radiator) and the car took longer to get hot, but it still got hot. I think we made it through most of a 20 minute session before it got too hot, however, we were not running 20 minute sessions, we were running 30 minute sessions. That seemed to be the problem. I guess I need to get rid of the cross over exhaust, get the pipe out from under the pan and get some air flow ducted in so that the radiator gets good airflow.
The car handled well for being on street tires and I'm not going to mess with the suspension for now. I think I'll leave that as is until I get the rest of it sorted out. It was quite neutral and had no problems running on the banking. It was even perfectly stable running into the brake zone at the end of the super speedway portion of the track. I was braking from 122 to about 25-30 mph and the car worked great.
So, I have a lot of work to do, but we learned a lot as well. Back to the garage....
Posted by: z28tt Jul 9 2007, 04:47 PM
When I first installed the new engine, oil pressure was lower than I liked. It turns out that the Mobil1 filter was causing most of the restriction. Swapping it out to a WIX or Fram racing filter gave back most of the pressure. I now run a CM remote filter with -12AN lines.
Posted by: trackbird Jul 13 2007, 03:59 AM
Ok, here are the promised pics of my plumbing disaster. It's getting crowded under this engine, that's for sure. I'll probably change some of this as I get time and get the engine out where I can access some of the other ports better.
The power steering caused me to get a bit creative, but I got it hooked up (I hate to use 180 hose ends).
I originally just had 2 90 degree hose ends on there. We then added a fitting for a mechanical oil pressure gauge.
Then, I added a T fitting to give me a place to port the 3 quart accusump into the system. Now it's starting to get crowded down there. And, no, I'm not happy with this, but I'll try it for now and change it as soon as I find a better way.
Then, I ran over and through the firewall with the accusump line. I don't like having it inside, and I wasn't happy with it outside (no real room under the hood). So, for now I'm putting it inside, though I've not mounted it yet. Here's where we run through the firewall.
Anyway, that's the latest on this project. I also think the power steering pressure hose is leaking. I don't think it's oil under the car (I thought I had a leak), I think it's PS fluid that I'm seeing. It wasn't boiling or anything, but I think the old hose is getting tired.

|

|

|

|

|

|

|
Posted by: trackbird Jul 15 2007, 12:04 AM
Today, the dyno:
Our local F-body group had a dyno day and I decided to drive it down and see what I'd learn on the rollers.
I learned a lot. The first pull was 18.1:1 on the dyno wide band from 2,500 to 5,000 rpm. Then, it started to come into line with where it should be (or at least closer). Axoid grabbed a laptop and my prom and we decided to add fuel. However, the VE (Volumetric Effeciency) tables on this car are pretty close to maxed and they won't take a number greater than 100%, so Bill (Axoid) suggested that we lie about the injector size. Sounds good to me, we need fuel. So, we adjusted the injector size from 23.8 lb hr to 22 lb hr, burned a prom and tossed it back in the car. Poof, the AFR was a little fat down low, and decent through the mid and upper range (and was no longer 18:1).
The first pull showed 298 hp and 324 ft lbs, even being that lean.
The second pull showed about the same HP and more torque (299.03 hp/338.62 ft lbs).
The third pull showed a final of 299.62 hp and 338.71 ft lbs.
For reference, my 2002 Z28 with 5,600 miles on it (on a portable chassis dyno) made 299 hp and 317.4 ft lbs.
This was odd to me since most dyno runs I've seen will run ok on the first, better on the second and drop on the third due to heat soak. I'm not complaining, so we'll go with it.
One oddity I noticed is that he was shutting down at the shift light (autometer set at 6,400 rpm). The dyno sheet shops at 5,800? Now, the stock tach is wrong, it shows about 7,000 at the shift light and the dyno shows 5,800? I'm a bit puzzled how we only got dyno numbers to 5,800...unless 5,800 is really 6,400 and the dyno tach is off. If so, none of the numbers are any good. So, I really don't know why it is what it is, but it's what I've got. They also had issues with the dyno and the 4,000 to 4,500 rpm band. It just vanished on two of my pulls. Not sure why, but it's gone without a trace (that was bad, really bad.... ). This was an in-ground dynojet (AWD Dynojet actually) and they said it seems to read 20 hp lower than the portable/trailer style dynojets in the area. Odd.
The engine specs are:
350 Chevy .020 over (353) (0 decked with splayed main caps, ARP studs, lunati "street race" rods and KB pistons)
Balanced rotating assembly
10.6:1 compression
ZZ4 cylinder heads with Manley Race Flo under cut valves and K-motion springs (Skim cut to make sure they were true)
Comp 305 cam (220/230 .510/.510 114 deg)
1.5 Comp Pro Magnum roller rockers
SLP headers and dual cat Y pipe (no cats)
SLP "two on the left" cat back
Underdrive pulleys
Holley Stealth Ram intake
52mm throttle body
MSD Pro Billet "drop in" (dual connector) distributor
Fludamper "Street Damper"
I think that's all the important bits. It's nothing radical, but it made decent power for using such small heads (they flow about 208 cfm at .550 lift). Next up, more heads, more cam and long tubes.....
Here's the sheet.

|
Posted by: John_D. Jul 15 2007, 02:32 AM
Did you have to do anything to the engine besides tuning, between Nashville and the dyno? (just curious...)
Posted by: trackbird Jul 15 2007, 03:13 AM
Nope, nothing at all. When I started it to put it on the trailer, it ran perfect. So, I guess it was just moody??? At least I didn't hurt it.
Posted by: sgarnett Jul 15 2007, 03:22 AM
It seems suspicious that you actually made it through a track day at 18:1. Are you sure there isn't a leak in the exhaust system somewhere upstream of the wideband?
Posted by: trackbird Jul 15 2007, 03:41 AM
I was wondering that exact same thing. And, I was thinking that I do hear a slight leak (I think). However, my wideband in the car wasn't showing it that lean and it's still not showing it to be real fat. So, I am thinking that the wideband from the dyno was off, but I'm thinking that the car is closer to 12.7:1 than 14.7:1 with the current settings and I'm content to leave it on the rich side of stoich. I think it's a bit safer. I was wondering how I could have made it through a track day that lean, and my wideband in the car wasn't showing it, so I'm thinking that it didn't happen, at least not that lean.
Posted by: Racerdad916 Jul 17 2007, 03:56 AM
Trackbird,
Your 92 sounds similar to my 89. I am tyrying to figure out what class it will fit in. It's a 355, Brodix heads, Jesel rockers, roller cam, h-beams, but stock block and crank. The CMC deal looked good until I got the the 305 section. I don't have any track time yet(read no NASA/SCCA licenses), and it will be next year before the car is done. AI/AIX looks like the spot for this car, but I am limited(kid in college)on budget. You mentioned autocross. Is there much in Ohio, more specifically, Columbus, where I can race when it's done. I would love to beat the blue oval guys in AI.....
Posted by: Mericet Jul 17 2007, 04:49 AM
Your 92 sounds similar to my 89. I am tyrying to figure out what class it will fit in. It's a 355, Brodix heads, Jesel rockers, roller cam, h-beams, but stock block and crank. The CMC deal looked good until I got the the 305 section. I don't have any track time yet(read no NASA/SCCA licenses), and it will be next year before the car is done. AI/AIX looks like the spot for this car, but I am limited(kid in college)on budget. You mentioned autocross. Is there much in Ohio, more specifically, Columbus, where I can race when it's done. I would love to beat the blue oval guys in AI.....
The OVR region of SCCA is pretty active (I guess you would have to be in CP at least) Their website: http://www.ovr-scca.org/index.asp If you do not pre-register get there early (7am) as the walkup registrations go quick.
Posted by: trackbird Jul 17 2007, 12:30 PM
Your 92 sounds similar to my 89. I am tyrying to figure out what class it will fit in. It's a 355, Brodix heads, Jesel rockers, roller cam, h-beams, but stock block and crank. The CMC deal looked good until I got the the 305 section. I don't have any track time yet(read no NASA/SCCA licenses), and it will be next year before the car is done. AI/AIX looks like the spot for this car, but I am limited(kid in college)on budget. You mentioned autocross. Is there much in Ohio, more specifically, Columbus, where I can race when it's done. I would love to beat the blue oval guys in AI.....
Welcome, sounds like a very nice toy. AI/AIX or AV8SS are probably where you'll wind up. However, being in college, I'd wait a bit. It's tough to race on a student budget, but if you can pull it off, have at it!!! Or, open track it until it's done and until your ready to run a series. That's what I'm going to do until the cage goes in.
If you're in the Columbus area, you should drop by one of these nights. We've been in the garage a lot lately (possibly an understatement).
That might be an understatement. We often get 200+ cars at our events. Bring it out and run CP. Heck, I ran CP on all season street rubber at the last event (I needed to shake the car down, and I found leaking axle seals).
Posted by: Racerdad916 Jul 17 2007, 01:11 PM
Actually, my daughter is in college. PM me, I would like to watch an autocross event. I am starting the SFC's this week, and I would like to start on the cage in the next week or two. It's killing me 'cause all the steel and cage parts are in the garage, I just don't have time. I am rebuilding a 700r4 for a friend of mine, so I can't make to much dust until it's done. I am in Grove City, so let me know. It's always cool to hang out with another car guy.....
I looked at AV8SS a little last night. Does that series come Ohio? My car may fit there as well. If not, sounds like I will have plenty of chances to break parts in Autocross/AI....
Posted by: Racerdad916 Jul 17 2007, 01:16 PM
I just clicked the link the the OVR SCCA page. Very Cool!!! I had no clue there were Autocross events in Columbus. I see they are at National Trails several times, and being a longtime drag racer(be around it 35+ years) I can't figure out where they would run out there....
Thanks for the info and PM me. We should get together and compare notes.......
Posted by: trackbird Jul 17 2007, 01:31 PM
I looked at AV8SS a little last night. Does that series come Ohio? My car may fit there as well. If not, sounds like I will have plenty of chances to break parts in Autocross/AI....
Ahh, the (kid in college) part made me think that was you and not that you had one. Makes sense to me.
I've rebuilt a few (11?) 700-R4's. Been there, done that, don't envy you.
AV8SS does not come to Ohio, but if you want to travel a bit, they run all over the eastern half of the US.
I'm in Galloway, so we're not too far apart.
Thanks for the info and PM me. We should get together and compare notes.......
I've never run an event at National Trails (I did make one drag pass there in my 2002 Z28 when it was new) and I am not driving that far for an event, so I'll be absent from the next one. I may start tearing the car back down. I'm looking to sell the exhaust, headers, cam, heads and injectors and replace them with some upgraded toys. I can't decide if I should just tear it down now, or wait a bit and drive it some more. Otherwise, I might run more CP (on street tires) this year....just for fun.
Sending PM.
Posted by: axoid Jul 17 2007, 03:42 PM
The next autocross is this weekend at trails. I'll be there.
Posted by: Racerdad916 Jul 22 2007, 01:02 PM
I would love to come out and watch, but a new washer turned into painting the laundry room, then new cabinets over the new washer and so on.... maybe I can work on the car NEXT week end......
Let me know when you are going to the Ackerman parking lot.... I would like to compare notes....
Billy
Posted by: fireeagle43 Jul 22 2007, 03:28 PM
Nice project there.. its painted similiar to the color scheme on mine. If you need some parts let me know, I just parted out a '91 to finish mine.
Posted by: trackbird Jul 23 2007, 02:47 AM
I think I'm pretty well fixed. I might want a spare steering box (quick ratio), but other than that, I'm in pretty good shape (I think....you never know).
Posted by: Racerdad916 Jul 23 2007, 03:43 AM
Kevin,
I was going back through this thread and saw that there is a local F-body group here in Columbus. How do I get hooked up with them?
Posted by: Mericet Jul 23 2007, 11:47 AM
I was going back through this thread and saw that there is a local F-body group here in Columbus. How do I get hooked up with them?
Their website is here http://www.cofba.org/ or PM axoid as he is the current president.
Posted by: Racerdad916 Jul 23 2007, 02:05 PM
just clicked over and it's very cool. Its on the to do list....
Posted by: trackbird Jul 28 2007, 05:51 AM
Ok, I learned from Mitch and Glenn and started attacking the seam filler with a knotted wire wheel. It makes pretty short work of it, and one heck of a mess, all at the same time. It's good that it takes it out so fast because there is so much of it. This car is one big ball of sealer. We'll take out what we can and then touch up the paint with something to prevent rust. No, that's not the "final" work in the pics, just some "in progress" shots since we've been pretty light on those lately.
The accusump is mounted. I don't like where it's mounted, but until the car gets caged, it is where it is. I stuck it in the very rear of the car, but at least it's in there. I'll move it once the fuel tank comes out, but in the meantime, it's going to stay there. If I have a failure, it's pretty far back and somewhat sheilded. If I get rear ended hard enough, the damage becomes even more expensive. If it doesn't seem to work, I'll move it.....someday.
Tomorrow, I'm going to get some 10-24 hardware to fit the riv-nuts I have. Whoever put 10-24 in the kit and not 10-32 needs their butt kicked. I've got a box of 10-32 stainless screws from my aircraft days. None of it is 10-24, none..... Once I get bolts, I'll adel clamp the braided line in place and cut it and put the last end on it. I might actually have this thing hooked up and running soon.

|

|

|

|
Posted by: nape Jul 28 2007, 08:30 PM
It's coming along! Get a cage in that thing, do some HPDEs, do the comp school, and come run AI
Posted by: trackbird Aug 2 2007, 04:25 AM
Ok, the radiator pressure warning light is in and wired. The Accusump is in, plumbed and wired. I wound up running the electric valve after all. I don't like it and once I put a fuel cell in the car and pull the tank, I'll move the accusump and switch to a manual valve. For now, it's better than nothing (I hope). Yes, I still have wires to loom up and tie out of harms way. I'll do that tomorrow.
We put a few placards in place so people will know what all the pretty lights are for. We got a bit creative with one or two of them. I guess we shouldn't make labels while tired from working in the garage....
The switch over the shift light is the manual control for the accusump. It's only hot with the key on, but you can manually turn it off if needed/wanted.
This thing is a wiring catastrophe. I've got to just rip everything out and tear it all down and start over. I've been having really bad thoughts of just putting a carb on it. I want to stay EFI, but a carb, an MSD distributor and a 6AL box will go a long way towards making my life really easy on the installation front. I'm not sure that I can bring myself to do it, but it's getting more and more tempting. Is that bad?

|

|

|

|

|

|

|

|
Posted by: Racerdad916 Aug 2 2007, 04:47 AM
Two things:
1.) Sleep is over rated, and you can do it when you get old.
2.) I vote for the carb and the MSD, but I like it old school....... and it's WAAAAAAAAY cheaper........ did I mention it's cheaper?
Posted by: Mericet Aug 2 2007, 05:04 AM
Well, you can always use MegaSquirt.
Posted by: mitchntx Aug 2 2007, 12:16 PM
Why is there still a back seat bracket in the car?
Posted by: Glenn98ZM6 Aug 2 2007, 12:26 PM
i used a putty knike and a hammer to peal out the bulk of that seam filler. lateri rigged up a "blade"in an air hammer w/ the pressure turned way down (20 PSI?). then i went in w/ the wire wheel.
the next car gets acid dipped.
just buy a painless harness. it wouldnt cost more than a carb and an MSD.
there is no way i'll ever go back to a carb.
Posted by: trackbird Aug 2 2007, 12:39 PM
There is just one, I haven't had time to get that one out yet. The spare tire bracket is gone, but I haven't pulled the seat bracket on the one side yet. I'm getting there.
just buy a painless harness. it wouldnt cost more than a carb and an MSD.
there is no way i'll ever go back to a carb.
I'm just blasting the sealer out with the wire wheel. It cleans to the shine.
The problem with a painless harness is that I still have a stock computer and I don't think it will run the engine combo that I'm thinking of running after this one (and maybe not the upgrade I'm going to do to this one). I could do a FAST system or similar, but that's a quick $2,000 or so. That's why I'm back to considering a carb.... I hate them, but they are easy. Wire an ignition box, fuel pump and set the timing. That would leave me a Holley Stealth Ram, 52mm throttle body, 24 lb injectors (SVO I think), MSD "dual connector" distributor and some other goodies to sell off to pay for the carb parts. It's still not my first choice....
Posted by: mitchntx Aug 2 2007, 12:45 PM
So you will have an issue with the computer's tune? Or is it a connector interface?
Painless has a lot of pertubations ... Call them and tell them your combo.
Posted by: trackbird Aug 2 2007, 01:01 PM
Painless has a lot of pertubations ... Call them and tell them your combo.
I don't think the stock TPI computer can be set up to run a 240/250-ish duration cam. And, I could wind up with something "evil" in the future, possibly sooner than later. So, I'd like to only do this once and when I get the computer/wiring done, I want to do it one time and be done with it, I don't want to be upgrading computers later.
Posted by: TwistedFocus Aug 2 2007, 01:32 PM
You'll probably end up needing to change the carb anyway (which isn't exactly cheap either) if you go off the deep end with the engine... and you will.
Posted by: StanIROCZ Aug 2 2007, 01:49 PM
Have you hung out at the Prom Tuning board at thirdgen.org? A lot of stuff has been done with the stock ECM. One trick for the stock computers with big cams is to run the computer in open loop for idle and low speed stuff. Closed loop won’t work when the valve overlap is sending fuel right out the exhaust. The O2 thinks the engine is running richer than it actually is, so it takes fuel out.
Running the stock ECM will probably work, but might just take more time to get right.
Posted by: slowcamaro Aug 2 2007, 02:49 PM
x2 When I convert to FI Im megasquirtin'
Posted by: trackbird Aug 2 2007, 02:52 PM
You'll probably end up needing to change the carb anyway (which isn't exactly cheap either) if you go off the deep end with the engine... and you will.
I'll sell carb A to finance carb B..... That will still make it less expensive as a whole (unfortunately).
Posted by: BumpaD_Z28 Aug 2 2007, 02:56 PM
You'll probably end up needing to change the carb anyway (which isn't exactly cheap either) if you go off the deep end with the engine... and you will.
I'll sell carb A to finance carb B..... That will still make it less expensive as a whole (unfortunately).
I'm not against fuel injection by any means but in a "all out" performance application, I will always challenge any F/I setup to a PROPERLY SETUP carburetor...
Besides you just wanna be more like NASCAR

Posted by: trackbird Aug 2 2007, 03:16 PM
I hate NASCAR. (however, if they want to pay me millions to drive in circles, I can be bought).
Posted by: BumpaD_Z28 Aug 2 2007, 03:22 PM
http://www.theonion.com/content/video/nascar_coach_reveals_winning
sorry this is off topic ... sorta
"STRAIGHTER !!!"
Posted by: Todd Aug 2 2007, 04:12 PM
Besides you just wanna be more like NASCAR
A properly setup FI will run within a few HP of a properly setup carb. The big difference will be that FI is WAY more flexible for part-throttle driveability. You could run a stock ECM (prob a `730) with an aggressive chip, convert to MS, or convert to an LS1 PCM (faster, more flexible tuning). It all depends if you are willing to spend the time to fine tune it...cause regardless of carb or FI, the more aggressive the cam, driveability will suffer (ie on-off-part throttle on an autocross course)
I chose to convert to the LS1 setup but am having difficulty with the fuel rails on my HSR hitting the distributor...
Posted by: trackbird Aug 2 2007, 04:59 PM
I wondered about adding a reluctor wheel and using an LS1 computer. Do you have any info on the swap?
Posted by: Todd Aug 3 2007, 03:19 PM
If you were to do that, you could go all the way with coil packs, etc. which I'm considering for later. Not sure what kind of signal you'd need for cam sensor running the LS1 program.
The conversion I'm doing uses the LS1 PCM with an Express van program in it (they used Gen I SBC in vans up to `03). The crank sensor is at the front in a plastic timing cover (like the ZZ4) and the reluctor is a 4 tooth unit. The distributor is a flat unit that is used for cam sensor but is basically a 180 degree hall effect. You can use a stock distributor and mod it by cutting teeth out of the trigger. The harness is the expensive part unless you hack your own. My motor came from a 99 suburban so i had all the extra parts but if you have time, you can pull them in a junk yard for cheap. 96-99 Vortec truck 4.3/5.0/5.7
The big problem is the LS1 program supports coil packs but not the 4 tooth reluctor so you'd have to fab one. The Express van program supports the 4 tooth reluctor but not coil packs.
original conversion on the trucks
http://www.pacificp.com/forum/viewtopic.php?t=3240&postdays=0&postorder=asc&start=400
third gen.org thread on TPI usage of this setup
http://www.thirdgen.org/techboard/tpi/383323-tpi-obdii-thoughts-opinions.html
I had extra difficulties because the distributor is flat and the plug wires come off the side and hit the fuel rails. At this point I don't think even with a custom rail I can get the wires to clear and have the rail continue to the #8 cylinder.
pic from when i was mocking it up
http://i58.photobucket.com/albums/g249/carcrazy1973/100_1589.jpg
Posted by: trackbird Aug 12 2007, 06:35 AM
Today I removed the SLP exhaust and added a Magnaflow muffler, a short section of straight pipe and a turn down. We also pulled the heat shields that were no longer needed and all of the emergency brake parts too. It's late, I'm tired and I'm going to skip right to the photos.

|

|

|

|

|

|
Posted by: trackbird Aug 14 2007, 05:02 AM
Tonight we learned a few valuable lessons.
While heading down to racerdad916's place, I heard a strange ringing/rattling sound. It wasn't changing in pitch and I couldn't tell what it was. Then, I gave a blip of throttle on the interstate and something hit the bottom of the car hard, and several times. About 10 miles later I figured out what it was. It was the PAB bolt on the front brakes and I now had a potentially very large problem (since I'm still doing 75 mph at this point). I wound up easing it off the highway exit ramp and into a gas station where the wheel locked up for the last 15 feet of my stop. Billy (Racerdad) brought a jack, some tools and an assortment of bolts and we put it back together and I was on my way to his place.
The second thing I learned is that you should always keep spares. Yesterday I sold the exhaust kit from the car and while he was here, he offered to buy my 1992 vintage 16" wheels from the Camaro. I decided that I already have IROC wheels and I'm going to buy 17's in the near future and I could use the garage space. So, I let them go. Today, while fixing the brake issue, I realized that I have a crack in one of my front IROC wheels. It split right at the bottom of the V between the spokes. So, I'll not be autocrossing on those any longer and now I need to dig up some wheels, or at least one front one. For now, we're going to use Billy's wheels, or at least a couple of them, but between us, we have 4 good rears and 2 good fronts (one from each set, his are the 1992 style as well). So, things aren't grand, but I think we'll make the next event (unless I find cracks in more wheels). I'm glad I found it out today and not on a track somewhere.....
Oh well, more to come later.
Posted by: Pilot Aug 14 2007, 08:45 AM
Kevin, I don't know what kind of offset you need... would the C4 wheels fit? If so you're always welcome to mine.
Posted by: trackbird Aug 14 2007, 11:52 AM
C4's would require a pretty serious spacer to fit my car, but thanks!
Posted by: nape Aug 14 2007, 10:11 PM
At least 2".
Posted by: slowTA Aug 14 2007, 11:29 PM
Kevin, I have a set of thirdgen wheels with dead 710s. http://www.plaftaphoto.com/gallery/album358/IMG_4039 I think they were sand blasted on the face and are painted black on the inside. They're round but I never checked for cracks.
PM/e-mail me.
Posted by: trackbird Aug 15 2007, 01:08 AM
Ok, I went out to take pics of the cracked IROC wheel and found that it's cracking on both sides of the spokes (and I'll be inspecting the others before running them again). This wheel has unknown mileage on it, but is in decent condition (appearance wise at least). These aren't great photos, but if you look at the rear of the area between the spokes, you'll see the cracks running in the center and then off to one side.

|

|
Posted by: trackbird Sep 2 2007, 10:47 PM
We finally got time to take another shot at the cooling issues I've been having. This time we replaced the TPI fans with a Flex-A-Lite Black Magic fan. It's got its own built in thermostat, it moves 3,000 cfm and we were hoping it would cure all of our problems.
Since there is a rather non stock radiator in this car, nothing is exactly a drop in fit. We removed the radiator, test fitted the fan and radiator and then notched the radiator support for clearance.
It was deburred.
Then we clamped the fan mount in place and it was welded to the car. This is supposed to clamp over the radiator, but we cut the vertical parts off and left the slotted mount to use for my car. We were afraid it wasn't going to fit very well with my radiator, so we took this approach.
We welded a strap across the opening to help support things after cutting the side out of it.
We welded an angle to the upper mount and bolted it to the radiator support.
And, the final result.

|

|

|

|

|

|

|
Posted by: trackbird Sep 2 2007, 10:55 PM
And, on the way home from the autocross today, I may have found a clue to my cooling issues. I can't swear that it's the entire problem, but it might be useful information in the pursuit of better cooling. A picture is worth a thousand words, so here they are....

|

|

|
Posted by: slowcamaro Sep 2 2007, 11:33 PM
Between the flap and your intrusion into the air stream, I hope you solved your problems. Looks like im going to have to do some cutting of my core support to fit my windstar fan setup...glad im not alone.
Posted by: trackbird Sep 3 2007, 04:02 AM
Well, I made a quick run through the gears on the way home and then I heard a noise. The car had been known to heat up quickly during a quick blast through a few gears and I figured I'd see if the fan helped. Well, after shoving the nose through the air at a particular velocity (that proved sufficient to uncover this little issue), the flap blew down and wound up dragging the last few miles to my house. I took that photo in my garage right before I posted it and it's still sitting that way at this time. I figure I'm going to mess with it in the morning and for now, I'm going to just stay inside and deal with it later.
Posted by: trackbird Sep 11 2007, 09:56 PM
Let the cooling experiments begin. We added a secondary air dam and extended the stock location air dam, we added panels above the air dam area on the sides to keep the air from just going up into the fenders. Now we just have to see if it actually works at all.
Here's the pics:

|

|

|

|

|

|

|

|

|
Posted by: cccbock Sep 12 2007, 01:24 AM
Here's the pics:
Well, if it doesnt work, you can always use it as a snowplow.
Bock (ducking)

Posted by: trackbird Sep 12 2007, 05:02 AM
Go ahead and yuck it up.....
I just got back from driving the car up to Mid Ohio to meet up with Mitch and Glenn and the car definately cools now. It used to run 150-180 degrees on the interstate in 70 degree weather at 80 mph (no thermostat). Now it gets up to 160-170 in town and as soon as I get moving at 45mph or more, it cools back to where the autometer gauge is sitting on the pin at 140 degrees. The oil temp made it to 180, but once we were moving, it was cooled to where it was coming out of the pan at 140 or less (the oil temp gauge was on the pin too, it used to run about 180 under the same conditions).
It will take an autocross and a track day to see if we really have something, but it looks good. Now I have to buy another thermostat and install it.......
Posted by: cccbock Sep 12 2007, 11:53 AM
I just got back from driving the car up to Mid Ohio to meet up with Mitch and Glenn and the car definately cools now. It used to run 150-180 degrees on the interstate in 70 degree weather at 80 mph (no thermostat). Now it gets up to 160-170 in town and as soon as I get moving at 45mph or more, it cools back to where the autometer gauge is sitting on the pin at 140 degrees. The oil temp made it to 180, but once we were moving, it was cooled to where it was coming out of the pan at 140 or less (the oil temp gauge was on the pin too, it used to run about 180 under the same conditions).
It will take an autocross and a track day to see if we really have something, but it looks good. Now I have to buy another thermostat and install it.......
Sounds very promising...glad to hear this problem is on the way to solution.
I hope you arent planning to drive that thing on the street much. My stock air dam on my 4th gen catches on everything it seems. Might take some new trailer loading and unloading techniques as well.....
Bock
Posted by: trackbird Sep 12 2007, 12:02 PM
Yea, trailer loading might be an interesting problem. However, it's mounted to the stock air dam and can still flex because of that mounting arrangement.
It only drug twice last night, and neither was much to be concerned about.... We'll see.
Posted by: cccbock Sep 12 2007, 12:31 PM
It only drug twice last night, and neither was much to be concerned about.... We'll see.
10 bucks says it will scrape on the oval to asphalt transition at Nashville....
Have fun
Bock
Posted by: Racerdad916 Sep 12 2007, 12:50 PM
Self-clearancing, dual function front air dam. Just another outstanding Trackbird Engineering product. Very Cool. You might need to switch to studded snow tires for the winter, that looks like it will push alot of snow.....
How did the car feel at speed? I'm wondering if it may have front end lift at RR speed.....
Posted by: trackbird Sep 12 2007, 01:07 PM
Have fun
Bock
I fully expect that. If it grinds a bit of clearance and still cools, I'm ok with it. I expected that it would eventually make its own ride height, all I have to do is drive it.
Um, uh, yea....lift doesn't seem like it's going to be a problem with this setup (and it didn't blow off of the car during our travels).
Posted by: Racerdad916 Sep 12 2007, 01:47 PM
cool..... 
Posted by: trackbird Sep 14 2007, 03:01 AM
Stuffed a high flow thermostat in it tonight. It runs 160-180 in town (35 mph) and cools to 160 as soon as I get moving. The oil came up to 180 instead of laying on the pin (that was coming out of the pan, not after the cooler) so I think I can get the oil temps working decent on track or with autocross abuse. We'll see what this does. First it wouldn't cool, now it cools too well. I can live with that, but I might need a 180 thermostat. We'll try the 160 first.....
Posted by: 27Cam02 Sep 14 2007, 04:04 AM
I just got back from driving the car up to Mid Ohio to meet up with Mitch and Glenn and the car definately cools now. It used to run 150-180 degrees on the interstate in 70 degree weather at 80 mph (no thermostat). Now it gets up to 160-170 in town and as soon as I get moving at 45mph or more, it cools back to where the autometer gauge is sitting on the pin at 140 degrees. The oil temp made it to 180, but once we were moving, it was cooled to where it was coming out of the pan at 140 or less (the oil temp gauge was on the pin too, it used to run about 180 under the same conditions).
It will take an autocross and a track day to see if we really have something, but it looks good. Now I have to buy another thermostat and install it.......
Hope so those your cooling problems SOLVED at Mid Ohio.
Posted by: trackbird Nov 23 2007, 06:22 PM
I swapped the car to antifreeze and water before the last autocross event. It now seems to creep up to 200 or 210 degrees on course where it didn't do that on water/water wetter. That's with a thermostat in the car, but if I have to I can always remove it for a track day if needed.
Posted by: hotpart.com Nov 25 2007, 05:38 PM
Antifreeze doesn't have as much cooling ability as straight water. We always ran water and water wetter with only enough antifreeze to keep the water from freezing during the winter.
Posted by: trackbird Nov 25 2007, 05:52 PM
I was thinking that was the case, but I'm still wondering why I'm running anything approaching warm with the cooling setup I have in the car. I'd expect it to lay on the pin, no matter what was in it (as long as it's not straight anti freeze). Even so, I think it will be fine and I'll flush it again next year and go back to water.
Posted by: V6RSR Dec 12 2007, 04:21 AM
I give you an old hot rod trick for coolant. use swiming pool water mixed with antifreeze. Also DO NOT buy that 50/50 antifreeze junk, but the full strength stuff and mix it down yourself. The "swimming pool water" is chemically treated water and will aid in picking up and disapating heat from the heads. Just kind of like how soap makes water wetter, so does the chemicals treating swimming pool water. It is generally good for reducing temps 10* over tap water.
Also, I just brushed over this thread for the first time. I wanted to comment on the old posts about the 5th page relating to camber. First as most everyone knows, its the tire that dictates the camber. A tire such as Toyo RA1's wants about -3* om anything. It depends on the tire brand and style. As for getting more cneg camber? *a little trick is to elther have the bolt holes on the spindles and struts slightly over drilled and offset drilled allowing the top inside of the wheel to be closer to the strut thus gaining neg camber BEFORE and strut mount adjustments are made. THere is a 3rd gen caster kit someone sells also that includes cam lobed bolts that do this very same offset. *another simple knowledge trick is in essence the lower the car the shorter the strut distance and the greater the angle to the sturt mount that can be achevied in both neg camber and pos caster settings.
Posted by: trackbird Jul 23 2008, 02:54 PM
Ahh, here we are 7+ months later...
It appears that it's getting to be time to make this thing legal for "something". So, there will be posts showing more progress in the near future. I'm working out the details of getting a Blaine Fabrication roll cage kit shipped most of the way across the country so we can make it safer. I'm shopping for fuel cells, fuel pumps, braided lines and the rest of a fuel system. I'm looking for race seats and I think it's getting to be time to get moving on this thing.
Right now it needs:
Cage
Fuel cell
Fuel system
Race seat
Radiator removed and cleaned by a shop (non distilled water causes calcium to clog things a bit, I knew better but was in a hurry).
It will likely also get (budget and time permitting):
Mini starter
MSD ignition
Camshaft change
Starter switch/panel
More wiring removed
Aftermarket steering column
Lift off 'glass hood
Paint?
More to come (see, I told you guys to buy this thing ).
Posted by: mitchntx Jul 23 2008, 03:09 PM
Win the lottery?
Posted by: trackbird Jul 23 2008, 03:12 PM
Nope. Just a broke guy "goin' racin'". Just like everyone else...
A broke guy with a renewed focus on doing something with this car. I can't seem to sell it for anywhere near what it's worth (my asking price was about 50% of what's invested in the car) and I can't race it as is. So, I guess it's back to Ramen noodles for a while.
Sadly, I could have probably finished this thing for what I've spent on chicken wings and beer in the last few months of being single and trying to keep myself entertained.
Posted by: trackbird Jul 23 2008, 10:44 PM
Cage kit order has been placed with Alan for a full cage and drivers NASCAR door bars.
One down, thousands to go...
Posted by: CMC #37 Jul 23 2008, 10:54 PM
One down, thousands to go...
Schweet!
Posted by: roadracetransam Jul 23 2008, 11:47 PM
Simplicity,
here is all the switches you will ever need.... placement is due to missing dash, plus I always wanted switches up top, like in a airplane. "ready for take off"
Posted by: Racerdad916 Jul 23 2008, 11:51 PM
guess I know what I'm doing this winter.......
Posted by: trackbird Jul 24 2008, 03:07 PM
And some fab work.
Posted by: CrashTestDummy Jul 28 2008, 04:50 PM
here is all the switches you will ever need.... placement is due to missing dash, plus I always wanted switches up top, like in a airplane. "ready for take off"
Heh, that's one more than we have, and I'm counting the battery kill switch.
Posted by: roadracetransam Jul 28 2008, 05:01 PM
here is all the switches you will ever need.... placement is due to missing dash, plus I always wanted switches up top, like in a airplane. "ready for take off"
Heh, that's one more than we have, and I'm counting the battery kill switch.
well yeah, but that is next to the b-pillar, in easy reach of safety crew
Posted by: trackbird Jul 28 2008, 05:02 PM
Started cleaning out the garage today so I can pull in a couple 220V sockets for us to weld in a cage. And, a 210 amp Hobart mig welder followed me home (with a cart, 10 lbs of wire and all kinds of good stuff). Now I need to buy another welding bottle (man, those have gone up since I last bought one).
I'm thinking 60 cu ft minimum, or should I go for an 80?
Posted by: StanIROCZ Jul 28 2008, 05:49 PM
I'm thinking 60 cu ft minimum, or should I go for an 80?
I can't remember what size my tank is, but it is the biggest tank that you can purchase / own. Any bigger and I would have to rent it for a monthly charge. Not sure if it is a state law or ?
http://weldingweb.com/showthread.php?t=13848
I think I have the 125 cu-ft. I wouldn’t go any smaller myself.
Posted by: trackbird Jul 28 2008, 06:04 PM
Yea, 125's are large. My cart is limited to a 75 lb bottle. I might push that a bit, but I'll have to start welding on the cart to make anything like that fit.
Posted by: slowcamaro Jul 28 2008, 06:08 PM
Take plenty of pics on how tight the main hoop fits, as you know im kind of in the boonies. I think I could manage the rest of a roll bar in my car if I manage to get just a good fitting main hoop.
PS - I never heard from you about that hood. I still have it.
Posted by: trackbird Jul 28 2008, 06:12 PM
PS - I never heard from you about that hood. I still have it.
You never gave me a phone number to call you while I was coming through town on Sunday. I was going to pick it up, but couldn't call you.
Alan is sending me the "kit" (he has templates from this cage) shown here:
http://www.skyhighway.com/~bfpix4/IMG_1880.JPG
Posted by: pknowles Jul 28 2008, 06:15 PM
I have an 80lb bottle and it's plenty big enough, 60lb are OK. I use my MIG in stages, do enough welding to go through a bottle in a week then I won't touch the MIG for 9 months. A mega big bottle is a PITA to move around. If you are a fab shop or do work for people on the side then I can see a 125lb of bigger making sense. But most of us don't weld enough to use that in 2 years! Except when you are initially building a car of course.
Posted by: slowcamaro Jul 28 2008, 06:30 PM
The number was in fact emailed to you. Well it'll likely still be here next time. LOL
Mainly I just want to see if the cage is tight enough to tie into the b-pillar area.
Posted by: trackbird Jul 28 2008, 06:35 PM
Oops. Somehow I missed that message (or forgot). Crap...
I'm probably going to do a 60 cu ft bottle. 60's are expensive these days, 80's are worse. The last 60 cu ft I bought was about $125 full. Looks like they are going to be $200-ish now.
Posted by: StanIROCZ Jul 28 2008, 08:44 PM
I've gone through 3 125’s of 100% Argon in the less than 2 years TIG welding. But I might use more gas since I have an air cooled torch and I use about 20-30 seconds of post timer.
I never thought a 125 was hard to handle. I can load and unload it from my truck myself without too much stress, but that could be because I’m a beast of a man. 
I have some 250’s too. Now those are BIG.
Something else to consider is I think they charge less per /cu/ft to fill larger tanks than smaller ones. At least they do for propane.
Posted by: Blainefab Jul 28 2008, 10:39 PM
I have 125's - they are the largest that I can get into the truck. Go smaller only if the LWS is close, and open on Sat. You can blow thru 1/3 tank on a weekend, and you don't want to run out Sun afternoon when you're on a tear.
edit - there's the rental option, too. If you don't think you'll use the welder much after the cage build, then buy a 60 for futures and weekend backup, and rent a 125 for the duration of the build. I pay about $40 for a 125 fill out here - you'll go thru a 125 on a full cage.
Posted by: trackbird Jul 28 2008, 10:50 PM
Might have to build a larger welder cart, or beef this one something serious. I'm sure I'll use the welder a good bit when I'm done. Maybe not "this much", but enough. Between Racerdad and I, we'd have two 60's (if that's what I buy). That might hold us, just keep them both topped off. Hmm...
Posted by: mitchntx Jul 29 2008, 12:05 AM
I have 125's - they are the largest that I can get into the truck. Go smaller only if the LWS is close, and open on Sat. You can blow thru 1/3 tank on a weekend, and you don't want to run out Sun afternoon when you're on a tear.
edit - there's the rental option, too. If you don't think you'll use the welder much after the cage build, then buy a 60 for futures and weekend backup, and rent a 125 for the duration of the build. I pay about $40 for a 125 fill out here - you'll go thru a 125 on a full cage.
Or find a "sponsor" that keeps you stocked in gas (Mig mix/argon/nitrogen ... even CO2 to make dry ice for that cool suit), wire, cut-off wheels and all those little things that add up over time.
Thanks Steve!
Natwel Welding Supply
702 Culebra Rd
San Antonio, TX 78201
(210) 736-2444

/shameless sponsor plug
Posted by: Eugenio_SS Aug 1 2008, 07:46 PM
I'm thinking 60 cu ft minimum, or should I go for an 80?
Wow... you need to snap some pix of that garage in "clean-mode" cause I have a guts feeling it's one of those priceless Kodak moments that almost never exist...
Posted by: trackbird Aug 1 2008, 08:14 PM
I'm thinking 60 cu ft minimum, or should I go for an 80?
Wow... you need to snap some pix of that garage in "clean-mode" cause I have a guts feeling it's one of those priceless Kodak moments that almost never exist...
Nope, I just have a very liberal definition of "clean". It looks about like it did, but I can find more floor space in 5 minutes by stacking stuff on the car.
Actually, I need to move some stuff upstairs into my ex wifes walk in closed (boxes and stuff). Guess she's not going to be needing it anytime soon.
Posted by: trackbird Aug 4 2008, 04:15 PM
Ok, the garage is now actually pretty clean. We have room to park the car in the center and open the doors to work. The 220 volt outlets are installed and wired and the welder is up and running (on flux core for now, should pick up an 80 cu ft bottle this week). I have a chop saw and I'll get a tubing notcher and we should be ready to go once the cage parts arrive. I'll try to post some pics when I get a chance.
And, I'm actually going to buy my 80 cu ft bottle from tractor supply. They want more for the bottle, but less for refils and they do bottles on exchange (and they are 1 mile away and open weekends). So, refils are going to be easy to get (even if we are at a track out of town) and they are cheaper refils. The initial price of the more expensive bottle and cheaper fill is about $10 more than the welding shop. But the welding supply wants $44 to refil an 80 cu ft and Tractor Supply wants $28. I just need to stop by and pick one up.
Posted by: trackbird Aug 6 2008, 02:23 AM
Ok, garage is now clean and equipped with a 210 amp mig welder with a 125 cu ft bottle of Carbon/Argon mix. So much for buying an 80 cu ft. Oddly, a 125 is 6.6" in diameter (my cart is for 7" and under) and weighs 75 lbs (which is the max rating on my cart, concidence? I think not...).
Posted by: StanIROCZ Aug 6 2008, 03:04 AM
I thought 125's were too "large"
Posted by: trackbird Aug 6 2008, 03:18 AM
I was thinking of 250's. A 125 is not the size I was thinking. I was thinking of the restaurant sized Helium tanks and thinking those were 125's. Those appear to be 250's and a 125 followed me home.
Posted by: Blainefab Aug 6 2008, 08:52 AM
I have to be real careful lifting things or I whack my back and I'm whining for a week. I've figured out how to get 125's in/out of the truck without using my back at all: I get positioned alongside the tank about 2' behind the tailgate. Bend the leg nearest the tank, keeping back vertical, and grabbing the cap of the tank with one hand, pull the tank over on my knee - I put the knee about 1/2way up the tank, and roll the tank about 120degrees, putting the bottom of the tank pointing up at the tailgate. I grab the bottom of the tank with the other hand as it rolls upward. A little heave towards the truck, catch the tank on the tailgate and slide it in. Out is the reverse. My typical gas run is 4 tanks, in and out of the truck twice, this works well for me.
Tie the tanks down well in the truck - a couple of spare tires back there help, and a pair of car tiedowns looped around the cap, one from each side. I once had a tank come loose on Hwy 17 - the thing bashed in both fender wells pretty bad before I made it to a turnout.
Posted by: trackbird Aug 6 2008, 02:06 PM
I strapped mine down to the back corner of the bed and then added a loop around the cap to keep it from flipping over the side of the bed (that could be really bad). Luckily I only have to transport it a mile or less.
Posted by: z28tt Aug 6 2008, 08:20 PM
When I was using the little Mig with the AR/CO2 mix, I had an 80 and would go through them pretty quickly (The mig has been on loan to a buddy for about 5 years now!). It sucked to be 90% done, and run out (sure - I've got just enough to finish the job! Right...) I now use a T size (300 cu ft, I believe) Argon rental bottle for the TIG. My skinny butt can "shrug" it up off the ground, lean against the back bumper of the durango, pivot it horizontal, and slide it in. Reverse to take it out, and then roll it on the bottom to the metal fab table/cart. Then it's the bitch lifting it 6" onto the mounting pad. Tank rental is about $60/yr from Abco, and about the same for a full bottle exchange, and lasts me about one year. I'd love to buy one outright, as I'd make back the rental fee, but no idea on how long a cert lasts, and what it costs to get it re-done.
Posted by: Blainefab Aug 6 2008, 09:04 PM
I've purchased all 7 of my tanks over the last 12yrs or so, and have never had to pay a cert fee. My LWS exchanges the cylinders rather than refilling. They must roll the cert fees into the gas cost.
Posted by: trackbird Aug 6 2008, 09:29 PM
They will exchange mine for $39.99 (125 cu ft) and I'm guessing it's the same thing.
It appears that this thread is going to wander on and off topic (which is fine) and eventually (hopefully) end up with a completed car...and maybe a clean garage.
Posted by: trackbird Aug 10 2008, 04:17 AM
Progress (I think).
AFCO radiator is out so I can have it cleaned. Yea, I know, use distilled water. I didn't, now I get to have a radiator shop clean it out. I know better, but I was in a hurry for the nashville thrash last year.
Harmonic balancer has been removed. I believe it is going to be headed off to one of our members soon.
While it's all out, I think I'm going to relocate the power steering cooler. I just have to find out what I'm going to do for the new mounting.
First pic is before:
Second pic is a sure sign that I'm working on something in the area. The only things missing would be a hammer and
Third pic is the new toy.
Fourth pic is after (lather, rinse and repeat):
Fifth pic is how I change power window motors from now on.
In the sixth pic, I invented the right angle saber saw blade.
Not to be out done, I then invented the offset sawzall blade. Seems that I'm hard on tools sometimes.
Anyone need some 3rd gen door glass or power window parts?

|

|

|

|

|

|

|

|
Posted by: trackbird Sep 7 2008, 04:30 AM
Well, a couple weeks ago, I pulled the radiator to have it cleaned at a shop. It had developed calcium deposits from the water I was using (I was in a rush and didn't use distilled water). While it was out, I pulled the harmonic balancer and shipped it to its new home with ReEntryRacer (here on frrax). I made some calls to ATI and wound up purchasing an aluminum "3 ring" 7" balancer. It was a special order and took a week or so to arrive. It's a bit lighter than most similar balancers. And, since 2-3 lbs is 2-3 lbs. I'll take weight savings where and when I can get it.
Upon reading the instructions, I was reminded that ATI balancers come "tight" and must be honed to fit. I checked the measurements on the crank and the balancer and decided I was only .0003" tighter than specified. So, I heated the hub in the oven and installed it...mostly. When it got almost seated, I stopped (thinking it was on) and it cooled. When I tried to move it the last 1/4", I broke my Blue Point balancer installation tool. Oops... Checking my measurements shows that I managed to make a "slight" mistake and it was a far tighter fit than I thought. Hence the broken tool.
Anyway, long story short. This morning I had Mike at Fast Racing hone out the balancer hub. While I was out, I renewed the tags on the car (because I really SHOULD drive this thing on the street). Then I installed the balancer and radiator as well as all kinds of other stuff. Put the car back together and backed it off the ramps, and out of the garage. This is where I learned how handy it is to remove the very large drain pan from under the car before backing down the ramps. I managed to drag it out into the driveway, crush it and leak coolant "everywhere". I had to jack up the car to pull the pan and then put the fluid in a container that would keep it from getting spilled even more.
On the other hand, taking it for a drive was worth all the headaches. This is the first time I've had this car legal to drive since last October. So, I went out to burn some fuel out of it and enjoy the nice weather. It's not the track, but it's a good start.
Posted by: StanIROCZ Sep 7 2008, 11:58 AM
Been there done that brother.
Glad you're making progress even if it seems like small steps.
Posted by: trackbird Sep 10 2008, 03:44 AM
Hood is mounted. It lines up "mostly well". I may have to move one of the dzus plates a bit, but it should work well enough for now.
Wipers, linkage and wiper motor are gone. The wiper arms didn't clear this hood. So, I'll consider the HRP race wiper setup if I need one. In the meantime, I'll just refresh the rain-x on the windshield.
Posted by: trackbird Sep 19 2008, 12:35 AM
Ok, I've learned something else interesting this week.
I was grinding some of the brackets out of the car and making a very impressive shower of sparks. Tonight I went to drive the car and when I sat down and noticed that there was "dirt" on the windshield. Turns out, that's not dirt, it's metal and it's embedded into the inside of the window. Oops.
Guess it's lexan time after all.
Posted by: Eugenio_SS Sep 19 2008, 01:12 AM
I was grinding some of the brackets out of the car and making a very impressive shower of sparks. Tonight I went to drive the car and when I sat down and noticed that there was "dirt" on the windshield. Turns out, that's not dirt, it's metal and it's embedded into the inside of the window. Oops.
Guess it's lexan time after all.
it won't buff out with the grinder ?
Posted by: pknowles Sep 19 2008, 01:38 AM
I was grinding some of the brackets out of the car and making a very impressive shower of sparks. Tonight I went to drive the car and when I sat down and noticed that there was "dirt" on the windshield. Turns out, that's not dirt, it's metal and it's embedded into the inside of the window. Oops.
Guess it's lexan time after all.
You're not the first one to learn this lesson.
Posted by: trackbird Sep 19 2008, 03:06 AM
I didn't figure I was, but I really never thought much of it...until now. Oh well, just means the window is coming out so I can weld the bars that run through the firewall. 3/16ths lexan is $255 from Harwood, through Jegs. Now we know.
Posted by: Blainefab Sep 19 2008, 08:29 AM
Ya, grind slag embeds itself into glass. That price on 3/16" is really low - are you sure it is mar resistant coated? GE's trademark is MR-10, there are others. If it is uncoated you won't like it, polycarbonate is very soft and scratches extremely easy. Also, most (NASA and SCCA, at least) sanctions require coated windshield.
Posted by: Todd Sep 19 2008, 12:50 PM
I was grinding some of the brackets out of the car and making a very impressive shower of sparks. Tonight I went to drive the car and when I sat down and noticed that there was "dirt" on the windshield. Turns out, that's not dirt, it's metal and it's embedded into the inside of the window. Oops.
Guess it's lexan time after all.
You're not the first one to learn this lesson.
yup, does the same thing to mirror glass too
Posted by: slowcamaro Nov 30 2008, 05:15 PM
Start on that cage yet? I want to see how it fits...
Posted by: trackbird Nov 30 2008, 08:12 PM
It's somewhere between California and Ohio as I type this. Once it arrives, it's probably going to be too cold in my uninsulated garage to work on it, so it's likely to be stuffed in the corner until spring. Or that's my guess right now.
Posted by: trackbird Dec 1 2008, 08:04 PM
Cage kit is in. I have the tracking number and I just have to go to the hub and pick it up. I hope to get it tonight or one day this week.
Posted by: Blainefab Dec 2 2008, 07:41 AM
4 pieces - looked like this before I strapped it to the pallet:
There's a bag of tabs and spoiler hardware wrapped up in the bundle with the main hoop.

Posted by: trackbird Dec 2 2008, 06:27 PM
I should be picking the cage up after work tonight.
Posted by: trackbird Mar 29 2009, 08:11 PM
Harwood says it's coated.
http://www.eharwood.com/catalog/product.php?productID=130
Now, they say "stock cut" or "flush cut". Stock cut is for using the stock trim. Am I going to reuse the stock rubber gasket? (I'm really asking). Flush cut is oversized. I'm betting it will be easier to screw down the stock size glass, and glue the rubber gasket back in place, but I could be wrong.
Anyone have any input?
Also, am I farther ahead to just get a painless wiring harness for the engine, a moroso fused switch panel to bolt to the roll cage and then gut everything but the brake lights?
Posted by: Blainefab Mar 29 2009, 11:17 PM
The Five Star Lexan I've been using is always oversized - adds cut to size and finish steps to the install. If you can get stock size definitely go for that.
No need for trim - remove all the trim and bolt the Lexan down with some thin weatherstrip. I use weld nuts in the front, bolt/nuts in the rear. #6 with flange cup washers: 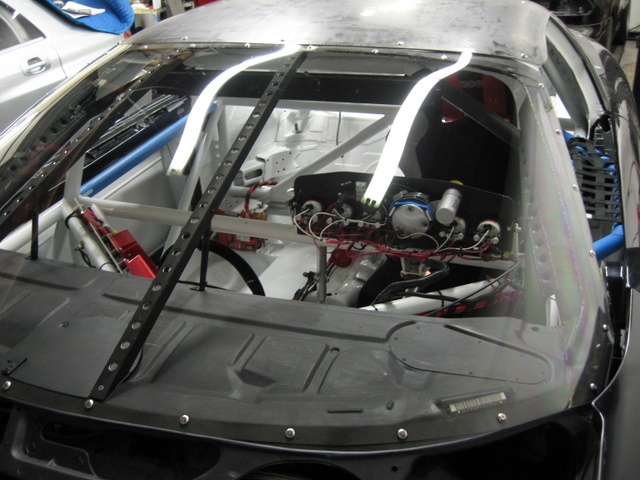

If you have 30-40hrs to invest, it is possible to get the stock harness near the weight of a Painless, but it will still be >15yrs old. Eric's car uses a FAST harness, with pieces of the OEM harness grafted in for brake light, ABS, and mirror circuits. Blue Sea 12 position fusebox at the far end of the electrical panel: 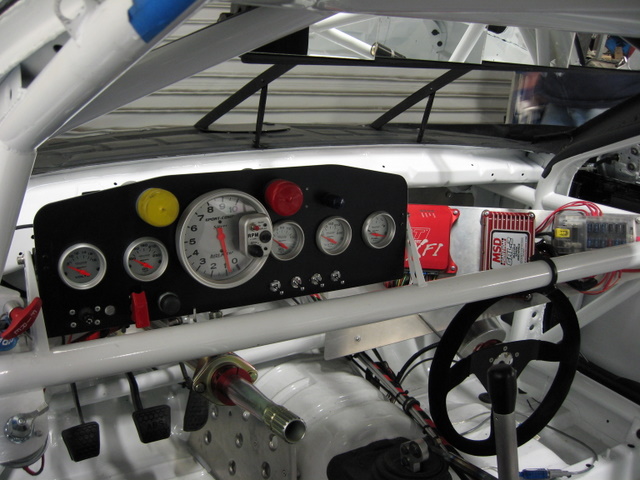
Posted by: StanIROCZ Mar 30 2009, 01:54 AM
Maybe not painless, but yeah, you might be depending how much your time is worth. Like Alan said I've probably already spend 40+ hours on mine and still looks like crap (extra lengths that need to be bundled in a loop etc), and I'll have probably another 20 in it to get it looking good with a new fuse panel etc. Now if I were to do it again it would take me 1/5th the time because most of the work is learning and tracing the circuits and I would have started with a new panel from the start. I fiddled with the factory panel too long. It is a rat’s nest DISASTER. Ditch that thing right away.
If it were me I wouldn't do Painless because the panel comes pre-wired and then you have to make the connection to all the individual plugs etc which is a bigger PIA than it may seem. I bought a Centech panel http://www.centechwire.com/catalog/panels/pdp1b.shtml that I will feed the factory harness into. I prefer that over a pre-wired panel since you can get all your wires tightly routed to the panel, bundled, and secured then the last thing to do is cut them to length and feed them into the panel. IMO, that will end up a better quality appearance.
If you want a full harness and panel that is the opposite of the Painless (connectors connected, but not panel) check out these places:
http://www.ronfrancis.com/prodinfo.asp?number=BB%2D99
http://www.watsons-streetworks.com/wiring_kits.html
http://www.kwikwire.com/wh_14CircuitStreetrodwiring.html
Or you can save some money and go half way like I am doing.
Another word of caution about the Painless TPI engine harness is I've heard that they don't use a VSS circuit which may give you some issues.
Alan, that car looks fan-freaking-tastic. Nice job as always. Do you make your own lexan supports? Are you a 5 star dealer?
Posted by: trackbird Mar 30 2009, 03:58 AM
http://www.painlessperformance.com/webcatalog/largeview.php?SearchField=60103
It says they have a VSS input?
Posted by: Blainefab Mar 30 2009, 08:38 AM
Thanks, Stan. Yes on both questions.
On the instrument panel - note those vertical supports on each side that attach to the IP about 1/2way up - those are pivot points. There is a lock arm on the bottom next to the starter button - loosen one screw to release the lock arm, and the whole IP flips 180deg to put the backside facing the driver. Quicker and easier than pulling the windshield to fiddle with instruments.
Posted by: StanIROCZ Mar 30 2009, 12:29 PM
It says they have a VSS input?
Ok, good. The "TPI and TBI Engine Swaping Manual" that my dad got years ago said that Painless did not have a VSS. Its good that they added it.
Posted by: trackbird Apr 6 2009, 04:45 AM
More progress (slow, but I'll take anything right now).
I made rear floor plates. They aren't spectacularly pretty, but I think they'll do once they are fully welded in place.
The dash is almost completely loose. I have to get a few last connections and it's going to be out on the floor.
And if anyone has a good idea about cutting these SFC's out...let me know. I'm sure I'll come up with something, but it's not looking like too much fun.

|

|

|

|

|

|

|
Posted by: TSHACK Apr 6 2009, 05:10 AM
I made rear floor plates. They aren't spectacularly pretty, but I think they'll do once they are fully welded in place.
The dash is almost completely loose. I have to get a few last connections and it's going to be out on the floor.
And if anyone has a good idea about cutting these SFC's out...let me know. I'm sure I'll come up with something, but it's not looking like too much fun.
The best thing I can think of is a die grinder & thin cut off wheels. Try to cut mostly on the SFC as much as possible. Find Stan's post when he cut his off for a look see. Have fun or get Stan to do it. He's practiced lately
Terry
Posted by: StanIROCZ Apr 6 2009, 12:28 PM
That job sucks (unless you have a lift, it might suck a little less). I like you TB but you'd have to pay me a lot lot lot of beer, chicken wings, and pizza to do that job for you.
Like TSHACK said, thin cut off wheels and cut the SFC rather than the chassis. I had to use a Dremel in a few places that the big boy couldn't reach.
Get a face shield. Plan on laying on your back getting showered with metal shavings. I covered my tires with a towel to protect them from the metal that was flying directly at them and I ended up starting the towel on fire once or 2x. Plywood would be better. I also tapped up the openings to the shocks to keep metal out of them and covered the rest of the "sensitive stuff" as best as I could. Removed the rod end LCA's.
I had some sheet metal repair work to do in the LF corner since I "welded the SFC's in a little too good".
I noticed the underside of your car is free of undercoat and looks rust free. NICE!
Posted by: trackbird Apr 6 2009, 03:09 PM
I feel bad sometimes when I remember that I'm building a race car out of a truly beautiful, rust free, never wrecked (that I can tell) '92 Z28 hardtop that was a factory 5.7 car. It is almost too nice to be a race car, but it needed too much $$$ in "stuff" to be a street car. So, it's going to the track.
I'm thinking a 7" cut off wheel in an angle grinder should get through most of that.
And, I can get wings and beer and pizza. There is a great wing place between my house and Jegs (2 miles?). You know you want to come visit...
Posted by: TwistedFocus Apr 6 2009, 03:11 PM
I made rear floor plates. They aren't spectacularly pretty, but I think they'll do once they are fully welded in place.
The dash is almost completely loose. I have to get a few last connections and it's going to be out on the floor.
And if anyone has a good idea about cutting these SFC's out...let me know. I'm sure I'll come up with something, but it's not looking like too much fun.
Two words - Plasma. Cutter.
I'll ask about that used one for sale if ya want. You'll need air though (not that you're not just waiting for a reason).
Posted by: StanIROCZ Apr 6 2009, 03:47 PM
I doubt they have enough beer wings and pizza.
I used a 4.5" wheel myself. I don't think my grinder has enough grunt for a 7", and you might find that the 7" will get in the way sometimes
Posted by: trackbird Apr 6 2009, 04:17 PM
They have LOTS of wings...
I was going to buy a 7" angle grinder. A 4.5" will not reach the back side of the tubes on my SFC's. I did pick up some 14" long sawzall blades to try first. I've got 3 sawzalls and that saves me buying a grinder.
And yes, check on that plasma cutter.
Posted by: CMC #37 Apr 6 2009, 05:38 PM
I'm thinking a 7" cut off wheel in an angle grinder should get through most of that.
And, I can get wings and beer and pizza. There is a great wing place between my house and Jegs (2 miles?). You know you want to come visit...
Not to worry, I'm making a street car out of my 1991 Formula. Hopefully Alan will have some pics of that soon!
Posted by: trackbird Apr 6 2009, 06:08 PM
I LOVE Formula's. Ahh, I miss my '89.
Posted by: Blainefab Apr 6 2009, 07:30 PM
I was going to buy a 7" angle grinder. A 4.5" will not reach the back side of the tubes on my SFC's. I did pick up some 14" long sawzall blades to try first. I've got 3 sawzalls and that saves me buying a grinder.
And yes, check on that plasma cutter.
I have many 4/4.5" angle grinders (Makita FTW!) and a Milwaukee 7" - the 7" rarely gets used 'cause it doesn't fit anywhere. The thin cutoff wheels from McMaster are working the best for me.
Are you saying that the SFC's are welded both to the sill pinch weld and to the pan? Don't worry too much about getting into the pinch weld flange - try to stay below the spot welds. Once they are off you can clean up the whole pinch weld and seam weld it. If the SFC's are welded to the pan, too, that will be a bitch - weld material is deadly on sawzall blades, but that is probably the only way you're going to get in there. Might try a tungsten carbide blade.
Ditto what everybody else wrote about protecting yourself and the rest of the car/shop from hot grinding slag. You WILL start a fire doing this job - keep a jug of water or a water soaked towel handy.
Plasma cutter isn't the best for this kind of work - cutting thru thick/irregularly shaped stuff can cause the flame to get redirected places you don't want it to go, even back at the operator.
Posted by: CMC #37 Apr 6 2009, 07:39 PM
I also miss my '89 Formula a white with black interior 350 "Wednesday" car. This '91 is going to make me feel better about selling that car!
Posted by: Blainefab Apr 6 2009, 07:45 PM
The dash is almost completely loose. I have to get a few last connections and it's going to be out on the floor.
Plates look good.
Dash is easier to deal with after column removal, and column removal easier before dash is dropped.
Posted by: trackbird Apr 6 2009, 07:45 PM
Alan,
I was thinking of a 7" to cut through the SFC (cut it off of the plate) by the rear LCA mount. A 4.5" angle won't get clear through that pipe. I can buzz the welds off of the pinch weld, no problem. It's cutting the front and rear loose that's likely going to be no fun.
Thanks! I had some concerns as I was working that out. I almost tossed the first one and started over. But I think they'll hold.
Now you tell me.
(I didn't really ask, I just did things my way, as I tend to do).
Posted by: trackbird May 4 2009, 04:18 AM
Well, the center roof support has been removed, the main hoop is fitted, 4 of the floor plates fitted and the SFC's have been cut off of the car. A local chassis shop welded them in, and they were really in there. I used a 4 1/2" angle grinder with cut off wheels and a sawzall with a 14" demolition blade to reach the things that needed reached and cut the stuff that needed cut. I need to clean up the cuts and grind out some leftovers, but overall, it went well. I only have a few spots where the cutoff wheel cut into the chassis and I can fix those with a quick blast of the mig welder. I completed the job without starting any fires. I had some smoke rolling out of a few places for a while, but no fire. I did managed to get enough grinding slag on my welding gloves that I felt my hand starting to burn inside the glove. So, wearing a cheap pair of harbor freight welding gloves while grinding (and a face sheild) was probably one of my better ideas (I wasn't tearing up my good welding gloves for that job). The garage floor is one serious mess of grinding slag and cutoff wheel dust.
I dropped the exhaust to get the one SFC out. While I was under the car, I noticed that I seem to have power steering fluid "everywhere". I think I overfilled it the last time, but I'm going to have to clean things up and find the source of this leak, if there is one. This may be a good reason to just go through the car in the near future.
I'll try to get some photos once I get back out to the garage. It's been a long day and I'm going to get some sleep. But any progress is good progress.
Posted by: 1meanZ May 4 2009, 04:52 PM
awesome. Keep plugging away.
Posted by: nape May 5 2009, 06:24 AM
I'll try to get some photos once I get back out to the garage. It's been a long day and I'm going to get some sleep. But any progress is good progress.
The serpentine setup makes the PS pump puke fluid out under high RPM because it tilts the pump. Either run the pump with barely enough fluid to touch the bottom of the stick (and still have it blow out) or take another pump, cut the neck off the reservoir, and use a piece of radiator hose and a couple hose clamps to extend the neck.
I just did the radiator hose trick and this is the first time I've ever been on track (since HPDE1 in 2005) and not blown out PS fluid. I even over filled the reservoir on accident!
Posted by: trackbird May 15 2009, 03:33 AM
Ok. Finally a real status update. I've been some combination of lazy and just uninspired to work on this thing lately, so progress has been slow...or non-existant. However, tonight I finally have some photos (and questions for Alan).
Pics:
Ok, the SFC's came out without doing too much damage.
I got the main hoop located and holes in the floor so I can weld the top of it. Tapped the floor plates under it and the main hoop is really tight against the roof (you can slightly feel the bulge when you run your hand over the roof skin). Is "really tight" actually too tight?
Alan I'm hoping this is where you wanted it located...

|

|

|

|

|
Posted by: nape May 15 2009, 04:25 AM
I can't speak for Alan, but move the main hoop back if you can. Notch the frame rail to body gusset and slide it in there. You can probably move the main hoop back 4-5".
I wish I would've stressed that more what I had my cage built. It might seem trivial now, but it leaves a lot more room for a triple master cylinder pedal setup/etc down the road.
PS- if this is going to be an AI car, you might want to search for an old thread of mine about gutting the roof. I took 15lbs out of mine then welded what was left of the roof to the halo bar. It's bad sprung weight, high and outside.
Posted by: Blainefab May 15 2009, 07:03 AM
Alan I'm hoping this is where you wanted it located...
Might be a little rearward than I intended at the base - notch a door bar and see if you'll be able to fit it to the main hoop without notching the door frame. You can take a little out of the frame, but weld it back up when you're done. Also, don't weld the plate in yet, don't even tack - those plates will be in and out of the car many times before your ready to weld them in.
Too tight is just right
Also, the angle that the main hoop will end up at will depend on the trim and fitup of the Apillar tubes - get those fitted before the backstays.
Posted by: trackbird May 15 2009, 12:00 PM
Am I a half inch back from your target or "inches"? I looked at the photos I took of Dave Schotts car and used the other links you gave me and my best guess was right there. However, it can be moved if needed. Is that the notch in the roof you were suggesting that I use, or should the top be forward too? I know the A pillar bars are going to determine the final location, but I was wondering if I shouldn't be targeting that particular notch after all.
Posted by: Blainefab May 15 2009, 07:30 PM
The Apillar tubes will determine where the top of the main hoop goes - fit them up next. Then, the middle door bar will determine where the base of the main hoop goes - I put door bar fab at the end of the build sequence, but since you have prebent door bars you'll have to position the main hoop to fit them. Fit the middle door bars between Apillar and main hoop, mark those locations and go back to the build sequence.
Posted by: trackbird Jun 10 2009, 03:42 AM
Progress!!! Thanks to Billy (Racerdad916), I finally got back to the garage and ripped the dash out (ok, we finished ripping the dash out) and started fitting tubing.
The front bar is just tacked at the top. I'm intending to push it out towards the circle you see on the floor plate. However, I have to see where the door bars land before doing the final fitting (as far as spacing from the wall). Alan, is this about where you wanted it? I looked at my pics of Dave Schott's car and I think I'm right where I should be (but tell me if I'm not).

|

|

|

|

|

|
Posted by: Blainefab Jun 10 2009, 11:49 AM
Looks good, but you should not have tacked the plates in - you'll need to cut them out and grind the tacks smooth. Read the whole build sequence before going any further.
Posted by: trackbird Jun 10 2009, 11:58 AM
We tacked it down to let us hammer form the plate to the wall. I expected to have to cut/grind them out.
Posted by: StanIROCZ Jun 10 2009, 12:49 PM
Crap! Your catching up with me!
Posted by: trackbird Jun 10 2009, 06:08 PM
Wow. I get one tube fitted and you're in danger? You better get moving...heck, I better get moving.
Posted by: StanIROCZ Jun 11 2009, 02:40 AM
Besides getting some seam welding done with my new MIG, I haven't made much progress in the past month. Softball 2-3x per week, a new puppy, and a landscaping project have been keeping me busy. Now vacation next week.
Yeah, I gotta get on the stick. Work is hinting at another short layoff, so that might be an unfortunate opportunity.
Posted by: trackbird Aug 10 2009, 03:12 AM
Here we are in August and I've not accomplished anything since June. Racerdad916 and I put in another hot afternoon of fitting, adjusting and such and pretty much wasted all the time we spent in the shop. No real progress was made and I'm probably behind where I was when we started the day. I managed to cut the angle wrong on one of the back stays and that tube is now back up tubing for verticals for my door bars. We did cut the windshield out of the car so we have some room to work, that is probably the best thing I can say about this weekend.
I'm actually reaching the point of being torn about what to do with this thing. I spent most of the weekend considering just parting it all out, selling off my two shells and looking for a car like Gary K has advertised, or a Corvette, or going out and buying a new TDI Jetta and dumping the truck and the project car. I'm not sure if I'd do it or not, but I'm starting to think I'd be a lot happier some days if I didn't have this thing on jack stands in my garage (on the other hand, after buying 4 new VW's between 2000 and 2004, I swore I'd never do that again either). It's worth far more in pieces than it is assembled, but I don't think it's worth nearly enough, even in pieces to actually get rid of it.
Posted by: Mojave Aug 10 2009, 03:15 AM
I'm actually reaching the point of being torn about what to do with this thing. I spent most of the weekend considering just parting it all out, selling off my two shells and looking for a car like Gary K has advertised, or a Corvette, or going out and buying a new TDI Jetta and dumping the truck and the project car. I'm not sure if I'd do it or not, but I'm starting to think I'd be a lot happier some days if I didn't have this thing on jack stands in my garage (on the other hand, after buying 4 new VW's between 2000 and 2004, I swore I'd never do that again either). It's worth far more in pieces than it is assembled, but I don't think it's worth nearly enough, even in pieces to actually get rid of it.
I'm can't offer advice on whether you should keep this car or not, but friends don't let friends buy new VW's. It's a huge money pit. Yes, the diesels get great mileage, but a few electrical gremlins and some engine problems and all your fuel savings go down the drain in repairs.
Posted by: trackbird Aug 10 2009, 03:18 AM
I know, I bought 3 brand new 2000 VW's (2.0 liter "base" golf 5 speed, 1.8t Jetta 5 speed and a 2.8 liter VR6 GTI 5 speed) and a new 2004 (1.8t GTI 5 speed). Every single one of them was in the shop...a lot. I know the service guys really well. They had my first GTI for about 8 weeks sorting out a transmission issue, as well as about 100 other trips.
Posted by: MikeP-99Z Aug 10 2009, 04:45 AM
Keep building.
Posted by: mitchntx Aug 10 2009, 12:16 PM
I'm actually reaching the point of being torn about what to do with this thing. I spent most of the weekend considering just parting it all out, selling off my two shells and looking for a car like Gary K has advertised, or a Corvette, or going out and buying a new TDI Jetta and dumping the truck and the project car. I'm not sure if I'd do it or not, but I'm starting to think I'd be a lot happier some days if I didn't have this thing on jack stands in my garage (on the other hand, after buying 4 new VW's between 2000 and 2004, I swore I'd never do that again either). It's worth far more in pieces than it is assembled, but I don't think it's worth nearly enough, even in pieces to actually get rid of it.
I get to this point as well. Geez, it seems like nothing works or fits or you find yourself having to tear it all down again in order to accomplish another target.
But each time I've been at this point and do work past it, I find that the car is 80% of 80% complete. Assemblies I've been fretting over and getting frustrated with bolt up and a huge chunk of the car is in place. When you see it begin to come together, that is the motivating part.
Posted by: trackbird Aug 10 2009, 02:04 PM
Billy (Racerdad) says the same thing, "We'll just keep plugging away".
Posted by: Pilot Aug 17 2009, 07:34 AM
Don't you dare get this car ready and then "do it again." That being said, seeing that kind of progress on the car makes me really wish I was up there helping! And before you can say it, I know the offer stands, don't worry, I'll get up there some time!
Powered by Invision Power Board (http://www.invisionboard.com)
© Invision Power Services (http://www.invisionpower.com)